第十章 智能体通信协议
在前面的章节中,我们构建了功能完备的单体智能体,它们具备推理、工具调用和记忆能力。然而,当我们尝试构建更复杂的 AI 系统时,自然会有疑问:如何让智能体与外部世界高效交互?如何让多个智能体相互协作?
这正是智能体通信协议要解决的核心问题。本章将为 HelloAgents 框架引入三种通信协议:MCP (Model Context Protocol)用于智能体与工具的标准化通信,A2A(Agent-to-Agent Protocol)用于智能体间的点对点协作,ANP(Agent Network Protocol)用于构建大规模智能体网络。这三种协议共同构成了智能体通信的基础设施层。
通过本章的学习,您将掌握智能体通信协议的设计理念和实践技能,理解三种主流协议的设计差异,学会如何选择合适的协议来解决实际问题。
1. 智能体通信协议基础
1.1 为何需要通信协议
回顾我们在第 7 章构建的 ReAct 智能体,它已经具备了强大的推理和工具调用能力。让我们看一个典型的使用场景:
from hello_agents import ReActAgent , HelloAgentsLLM
from hello_agents.tools import CalculatorTool , SearchTool
llm = HelloAgentsLLM ()
agent = ReActAgent ( name = "AI助手" , llm = llm )
agent . add_tool ( CalculatorTool ())
agent . add_tool ( SearchTool ())
# 智能体可以独立完成任务
response = agent . run ( "搜索最新的AI新闻,并计算相关公司的市值总和" )
这个智能体工作得很好,但它面临着三个根本性的限制。首先是工具集成的困境 :每当需要访问新的外部服务(如 GitHub API、数据库、文件系统),我们都必须编写专门的 Tool 类。这不仅工作量大,而且不同开发者编写的工具无法互相兼容。其次是能力扩展的瓶颈 :智能体的能力被限制在预先定义的工具集内,无法动态发现和使用新的服务。最后是协作的缺失 :当任务复杂到需要多个专业智能体协作时(如研究员+撰写员+编辑),我们只能通过手动编排来协调它们的工作。
让我们通过一个更具体的例子来理解这些限制。假设你要构建一个智能研究助手,它需要:
# 传统方式:手动集成每个服务
class GitHubTool ( BaseTool ):
"""需要手写GitHub API适配器"""
def run ( self , repo_url ):
# 大量的API调用代码...
pass
class DatabaseTool ( BaseTool ):
"""需要手写数据库适配器"""
def run ( self , query ):
# 数据库连接和查询代码...
pass
class WeatherTool ( BaseTool ):
"""需要手写天气API适配器"""
def run ( self , location ):
# 天气API调用代码...
pass
# 每个新服务都需要重复这个过程
agent . add_tool ( GitHubTool ())
agent . add_tool ( DatabaseTool ())
agent . add_tool ( WeatherTool ())
这种方式存在明显的问题:代码重复(每个工具都要处理 HTTP 请求、错误处理、认证等),难以维护(API 变更需要修改所有相关工具),无法复用(其他开发者的工具无法直接使用),扩展性差(添加新服务需要大量编码工作)。
通信协议的核心价值 正是解决这些问题。它提供了一套标准化的接口规范,让智能体能够以统一的方式访问各种外部服务,而无需为每个服务编写专门的适配器。这就像互联网的 TCP/IP 协议,它让不同的设备能够相互通信,而不需要为每种设备编写专门的通信代码。
有了通信协议,上面的代码可以简化为:
from hello_agents.tools import MCPTool
# 连接到MCP服务器,自动获得所有工具
mcp_tool = MCPTool () # 内置服务器提供基础工具
# 或者连接到专业的MCP服务器
github_mcp = MCPTool ( server_command = [ "npx" , "-y" , "@modelcontextprotocol/server-github" ])
database_mcp = MCPTool ( server_command = [ "python" , "database_mcp_server.py" ])
# 智能体自动获得所有能力,无需手写适配器
agent . add_tool ( mcp_tool )
agent . add_tool ( github_mcp )
agent . add_tool ( database_mcp )
通信协议带来的改变是根本性的:标准化接口 让不同服务提供统一的访问方式,互操作性 使得不同开发者的工具可以无缝集成,动态发现 允许智能体在运行时发现新的服务和能力,可扩展性 让系统能够轻松添加新的功能模块。
1.2 三种协议设计理念比较
智能体通信协议并非单一的解决方案,而是针对不同通信场景设计的一系列标准。在本章以目前业界主流的三种协议 MCP、A2A 和 ANP 为例进行实践,下面是一个总览的比较。
1)MCP:智能体与工具的桥梁
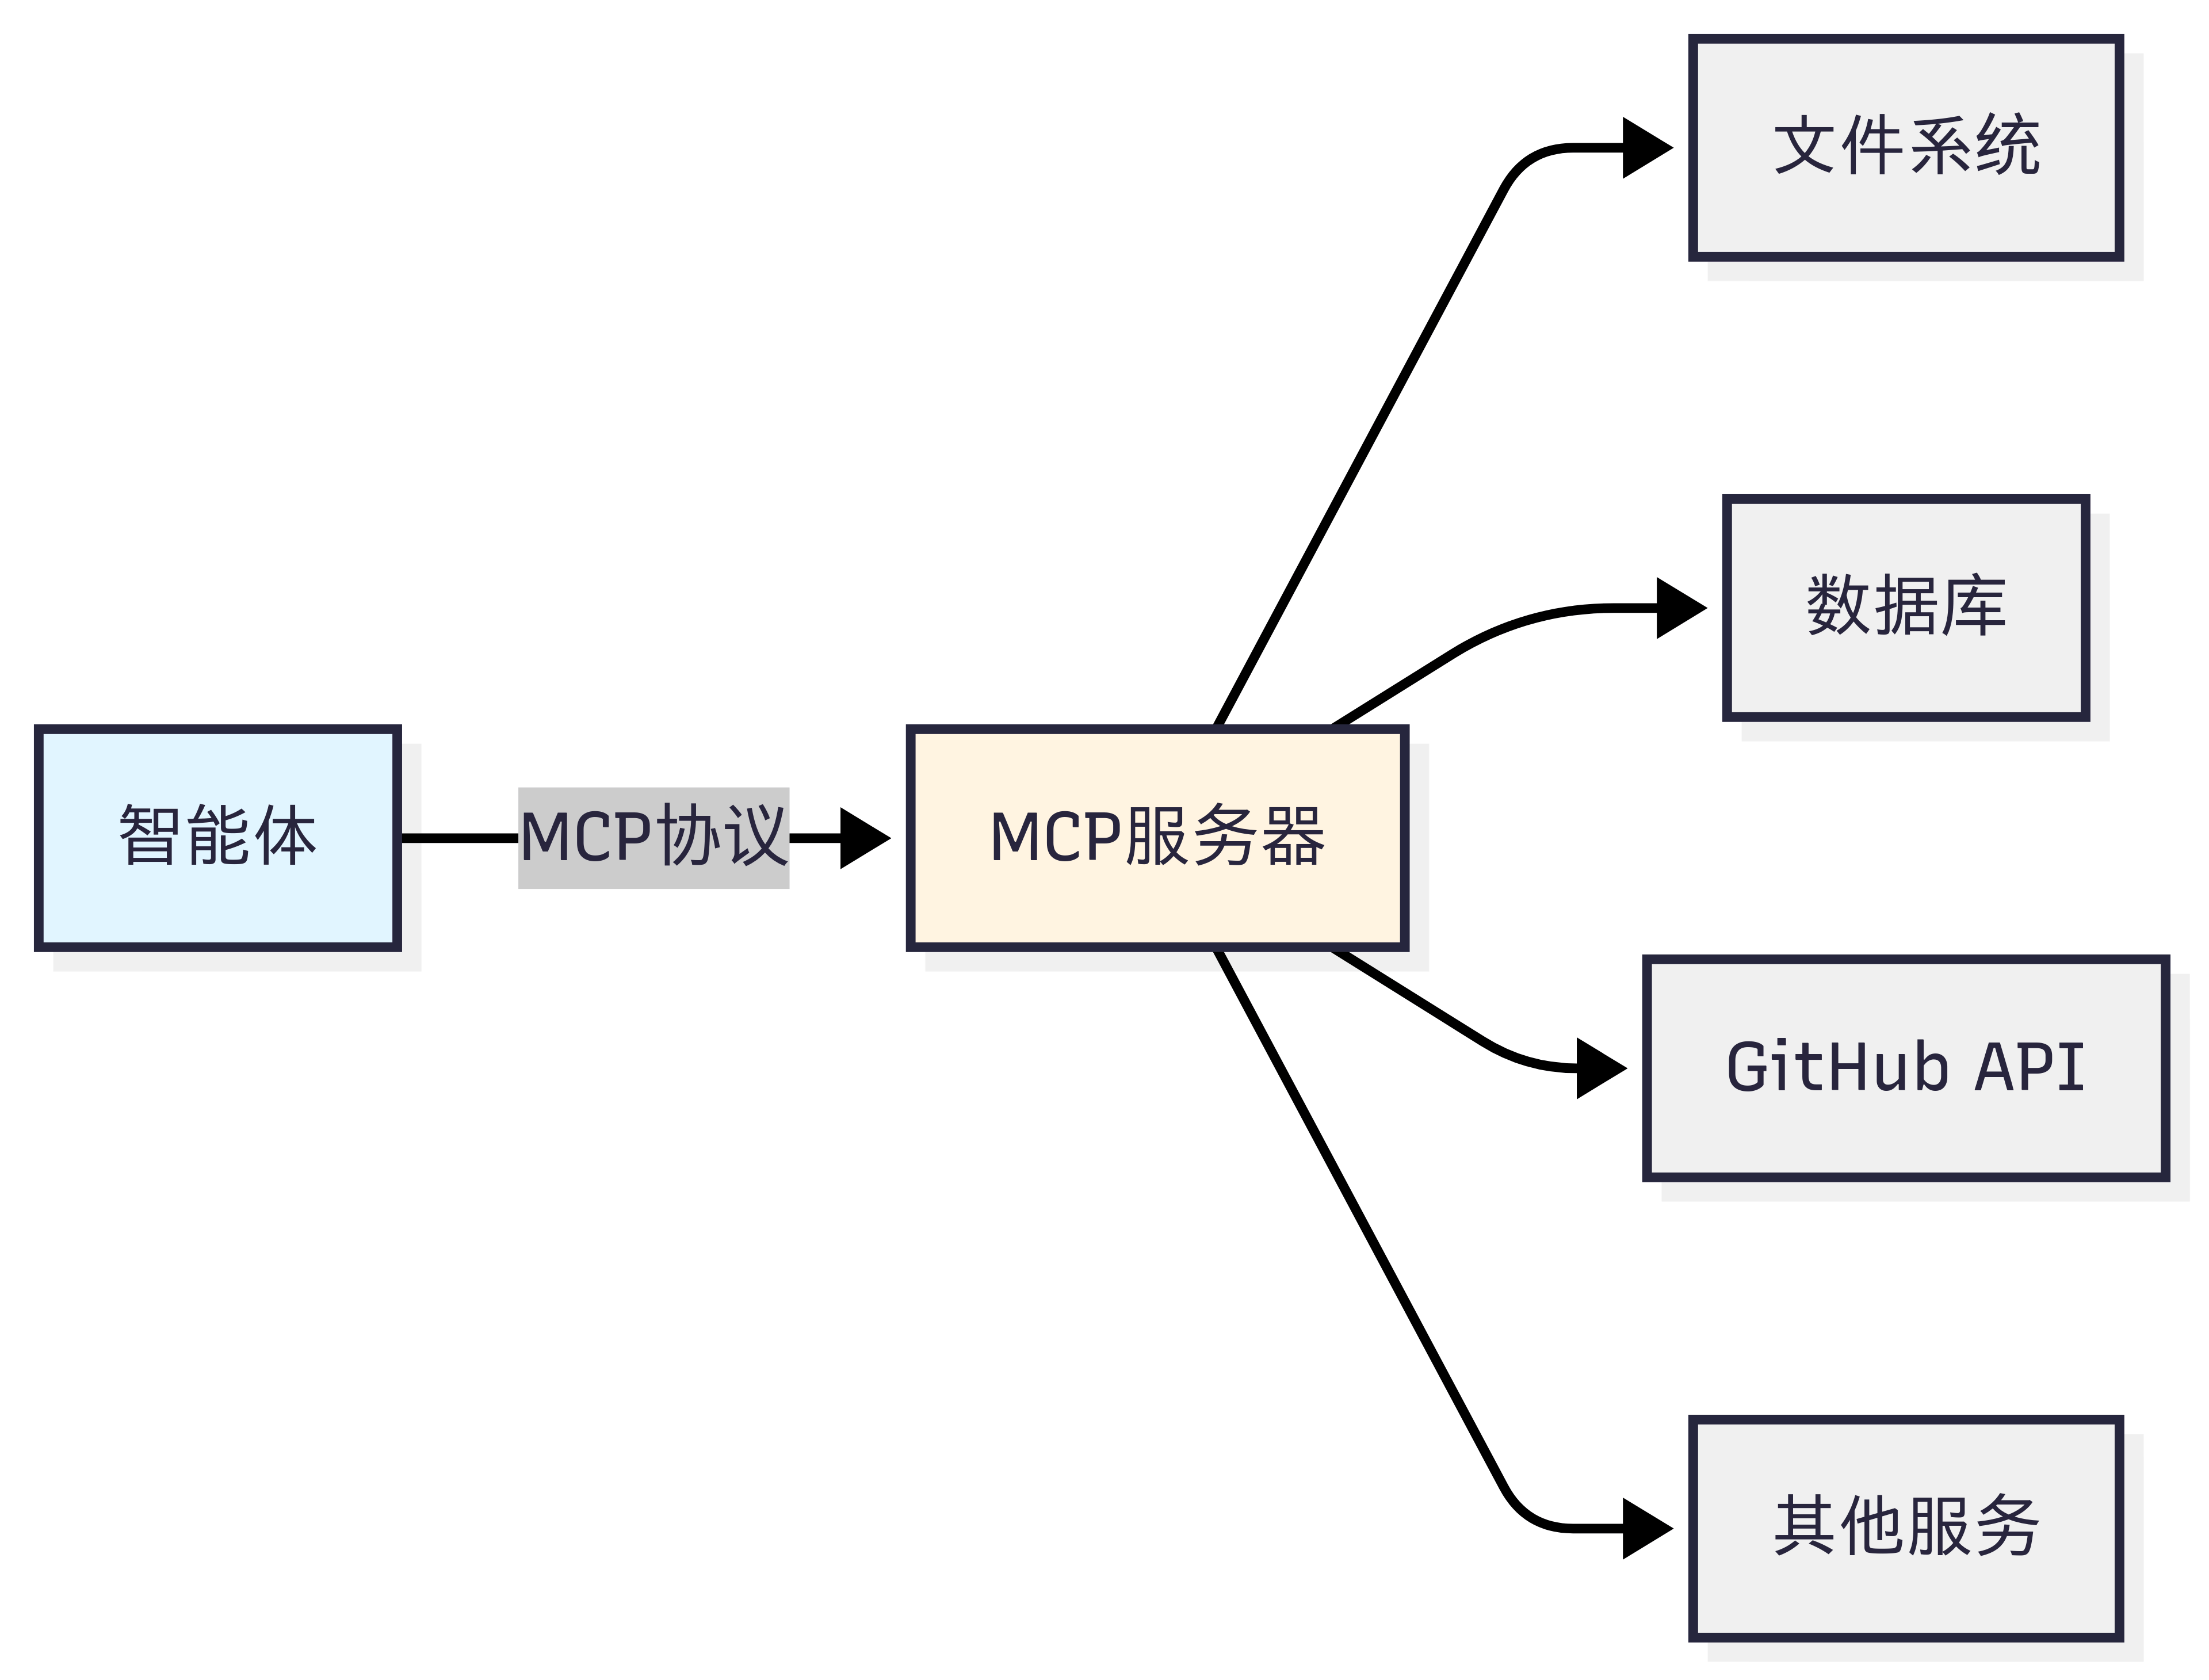
MCP(Model Context Protocol)由 Anthropic 团队提出标准化智能体与外部工具/资源的通信方式 。想象一下,你的智能体需要访问文件系统、数据库、GitHub、Slack 等各种服务。传统做法是为每个服务编写专门的适配器,这不仅工作量大,而且难以维护。MCP 通过定义统一的协议规范,让所有服务都能以相同的方式被访问。
MCP 的设计哲学是"上下文共享"。它不仅仅是一个 RPC(远程过程调用)协议,更重要的是它允许智能体和工具之间共享丰富的上下文信息。如图1 所示,当智能体访问一个代码仓库时,MCP 服务器不仅能提供文件内容,还能提供代码结构、依赖关系、提交历史等上下文信息,让智能体能够做出更智能的决策。
图1: MCP 设计思想
2)A2A:智能体间的对话
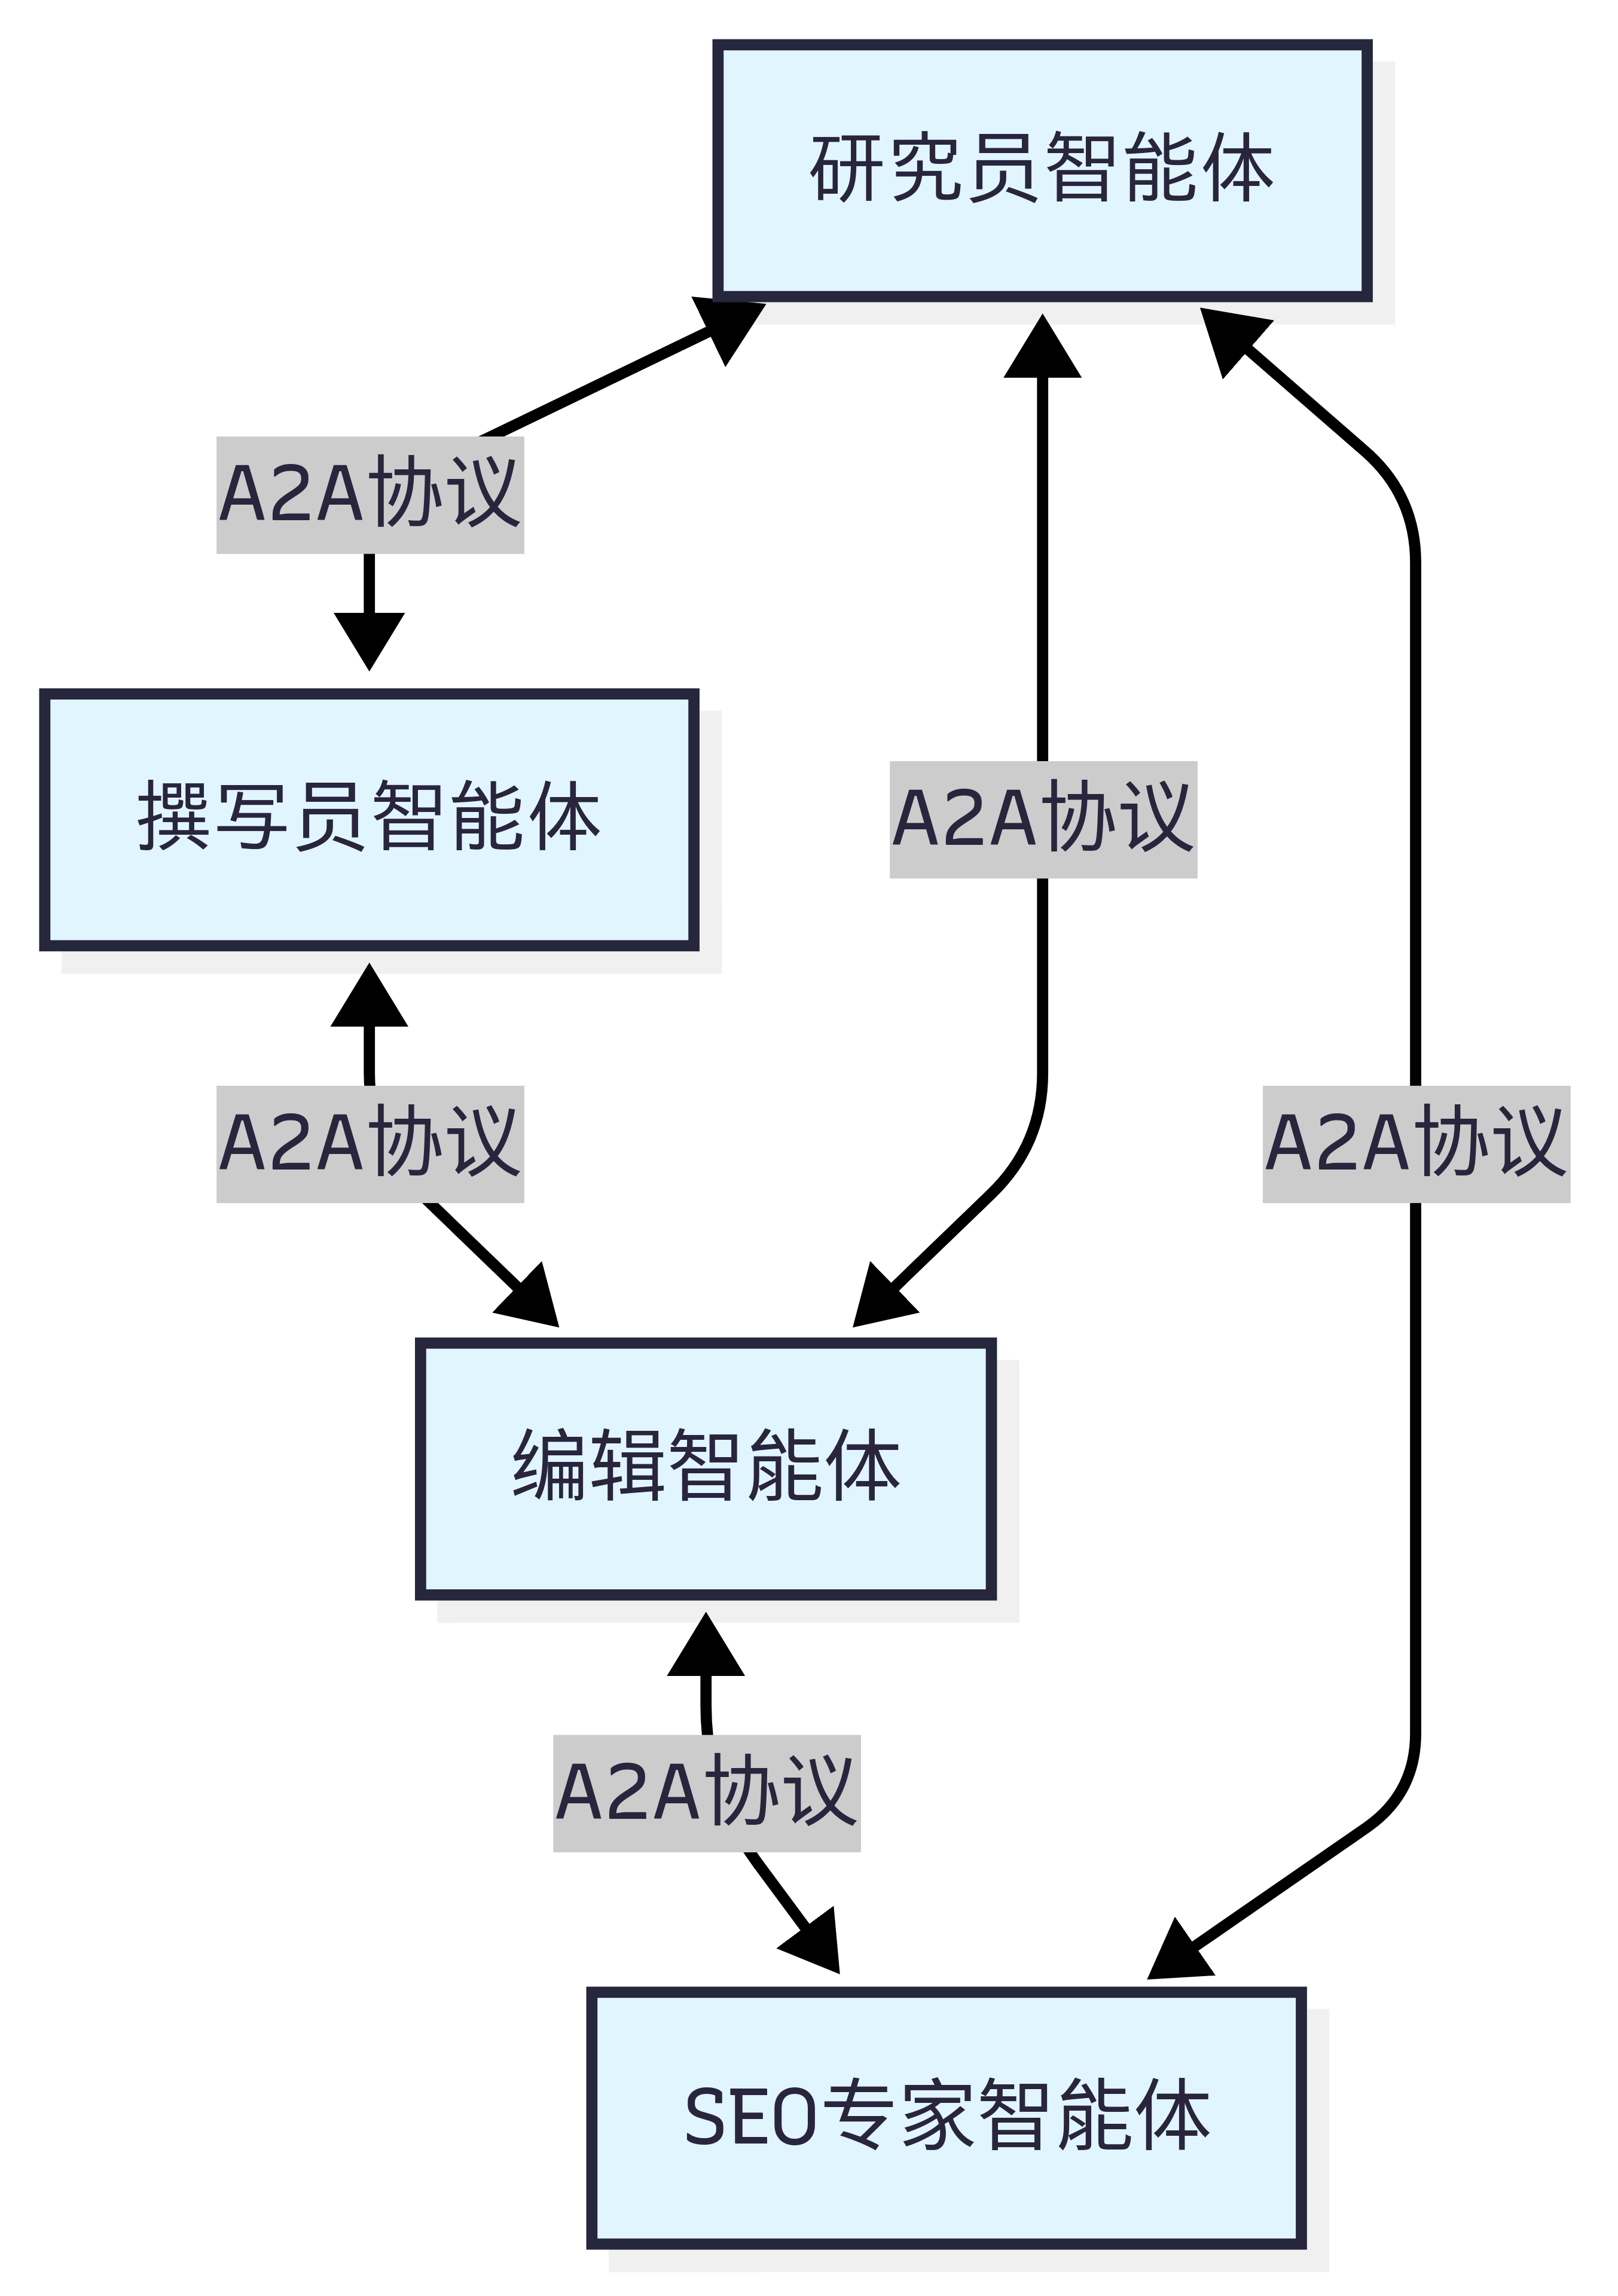
A2A(Agent-to-Agent Protocol)协议由 Google 团队提出实现智能体之间的点对点通信 。与 MCP 关注智能体与工具的通信不同,A2A 关注的是智能体之间如何相互协作。这种设计让智能体能够像人类团队一样进行对话、协商和协作。
A2A 的设计哲学是"对等通信 "。如图2 所示,在 A2A 网络中,每个智能体既是服务提供者,也是服务消费者。智能体可以主动发起请求,也可以响应其他智能体的请求。这种对等的设计避免了中心化协调器的瓶颈,让智能体网络更加灵活和可扩展。
图2:A2A 设计思想
3)ANP:智能体网络的基础设施
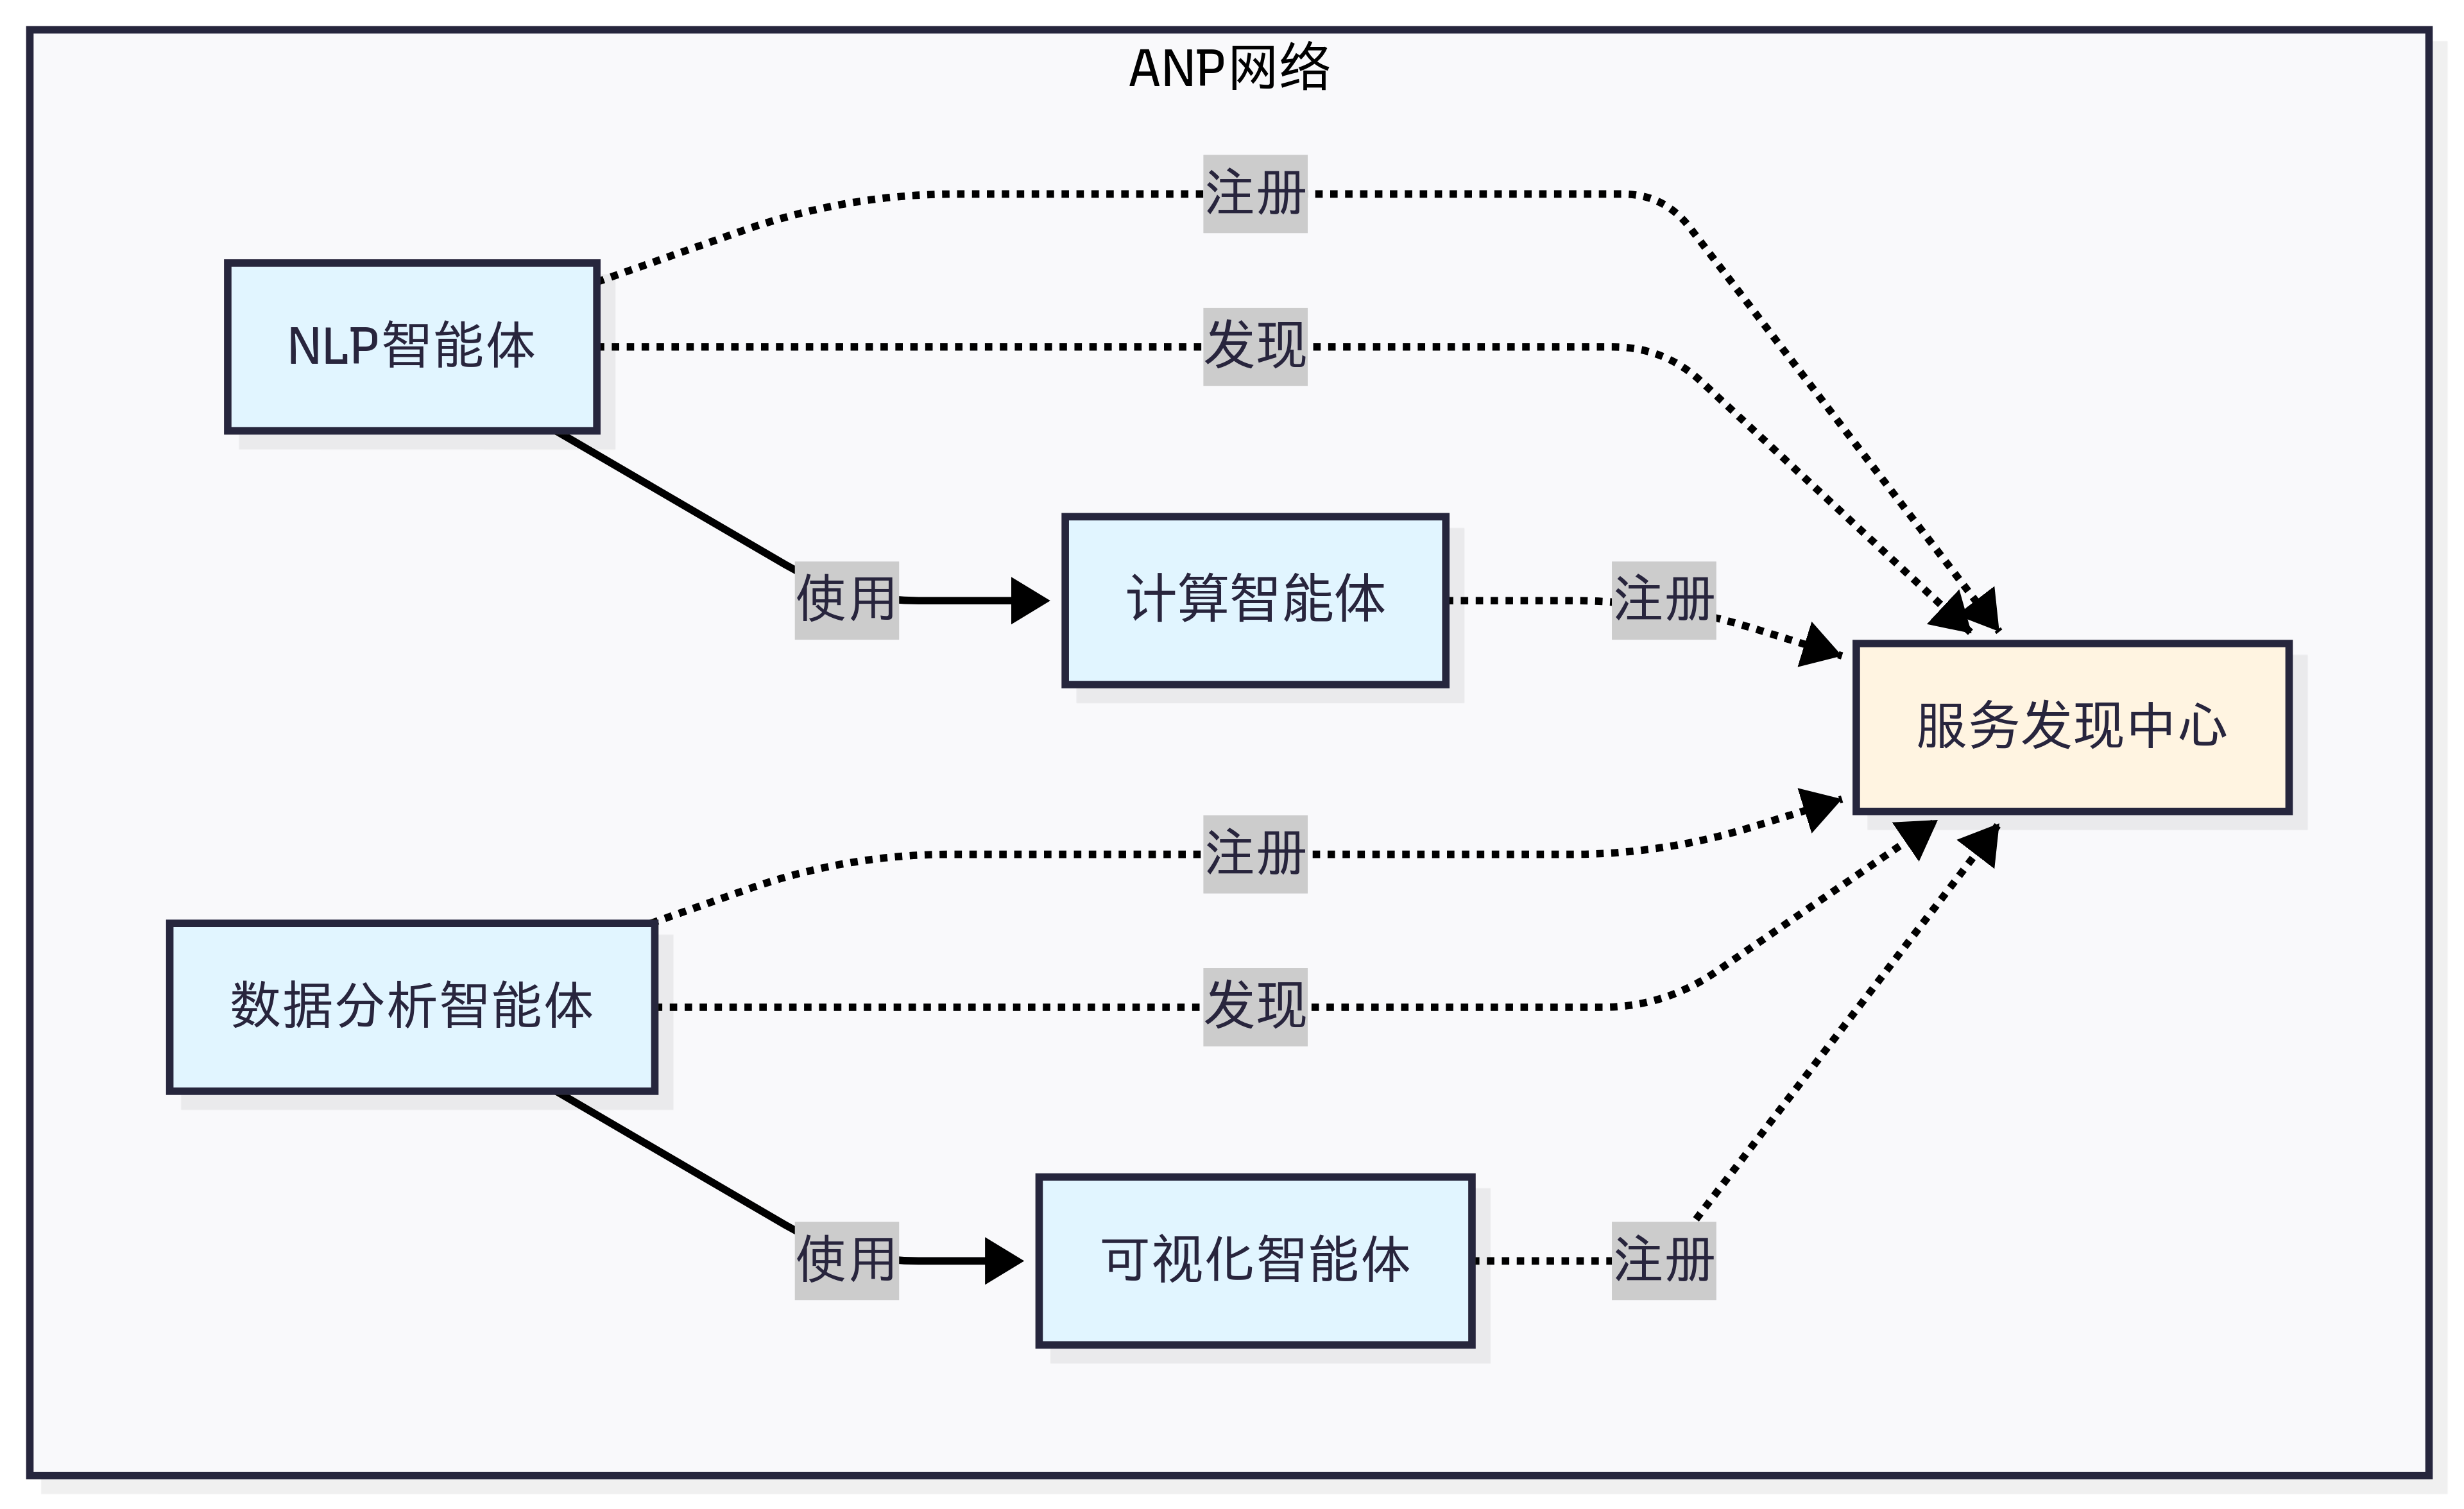
ANP (Agent Network Protocol)是一个概念性的协议框架构建大规模智能体网络的基础设施 。如果说 MCP 解决的是"如何访问工具",A2A 解决的是"如何与其他智能体对话",那么 ANP 解决的是"如何在大规模网络中发现和连接智能体"。
ANP 的设计哲学是"去中心化服务发现"。在一个包含成百上千个智能体的网络中,如何让智能体能够找到它需要的服务?如图 10.3 所示,ANP 提供了服务注册、发现和路由机制,让智能体能够动态地发现网络中的其他服务,而不需要预先配置所有的连接关系。
图3:ANP 设计思想
最后在表1 中,让我们通过一个对比表格来更清晰地理解这三种协议的差异:
维度
MCP
A2A
ANP
设计目标
智能体与工具/资源的标准化通信
智能体间的点对点通信
大规模智能体网络的服务发现
通信模式
客户端-服务器(C/S)
对等网络(P2P)
对等网络(P2P)
核心理念
上下文共享
对等协作
去中心化发现
适用场景
访问外部工具和数据源
智能体协作和任务委托
大规模智能体生态系统
扩展性
通过添加MCP服务器扩展
通过添加智能体节点扩展
支持动态扩展
实现状态
已有成熟实现(FastMCP)
官方SDK可用
概念性框架
4)如何选择合适的协议?
目前的协议还处于发展早期,MCP 的生态相对成熟,不过各种工具的时效性取决于维护者,更推荐选择大公司背书的 MCP 工具。
选择协议的关键在于理解你的需求:
如果你的智能体需要访问外部服务(文件、数据库、API),选择MCP
如果你需要多个智能体相互协作完成任务,选择A2A
如果你要构建大规模的智能体生态系统,考虑ANP
1.3 HelloAgents 通信协议架构设计
在理解了三种协议的设计理念后,让我们看看如何在 HelloAgents 框架中实现和使用它们。我们的设计目标是:让学习者能够以最简单的方式使用这些协议,同时保持足够的灵活性以应对复杂场景 。
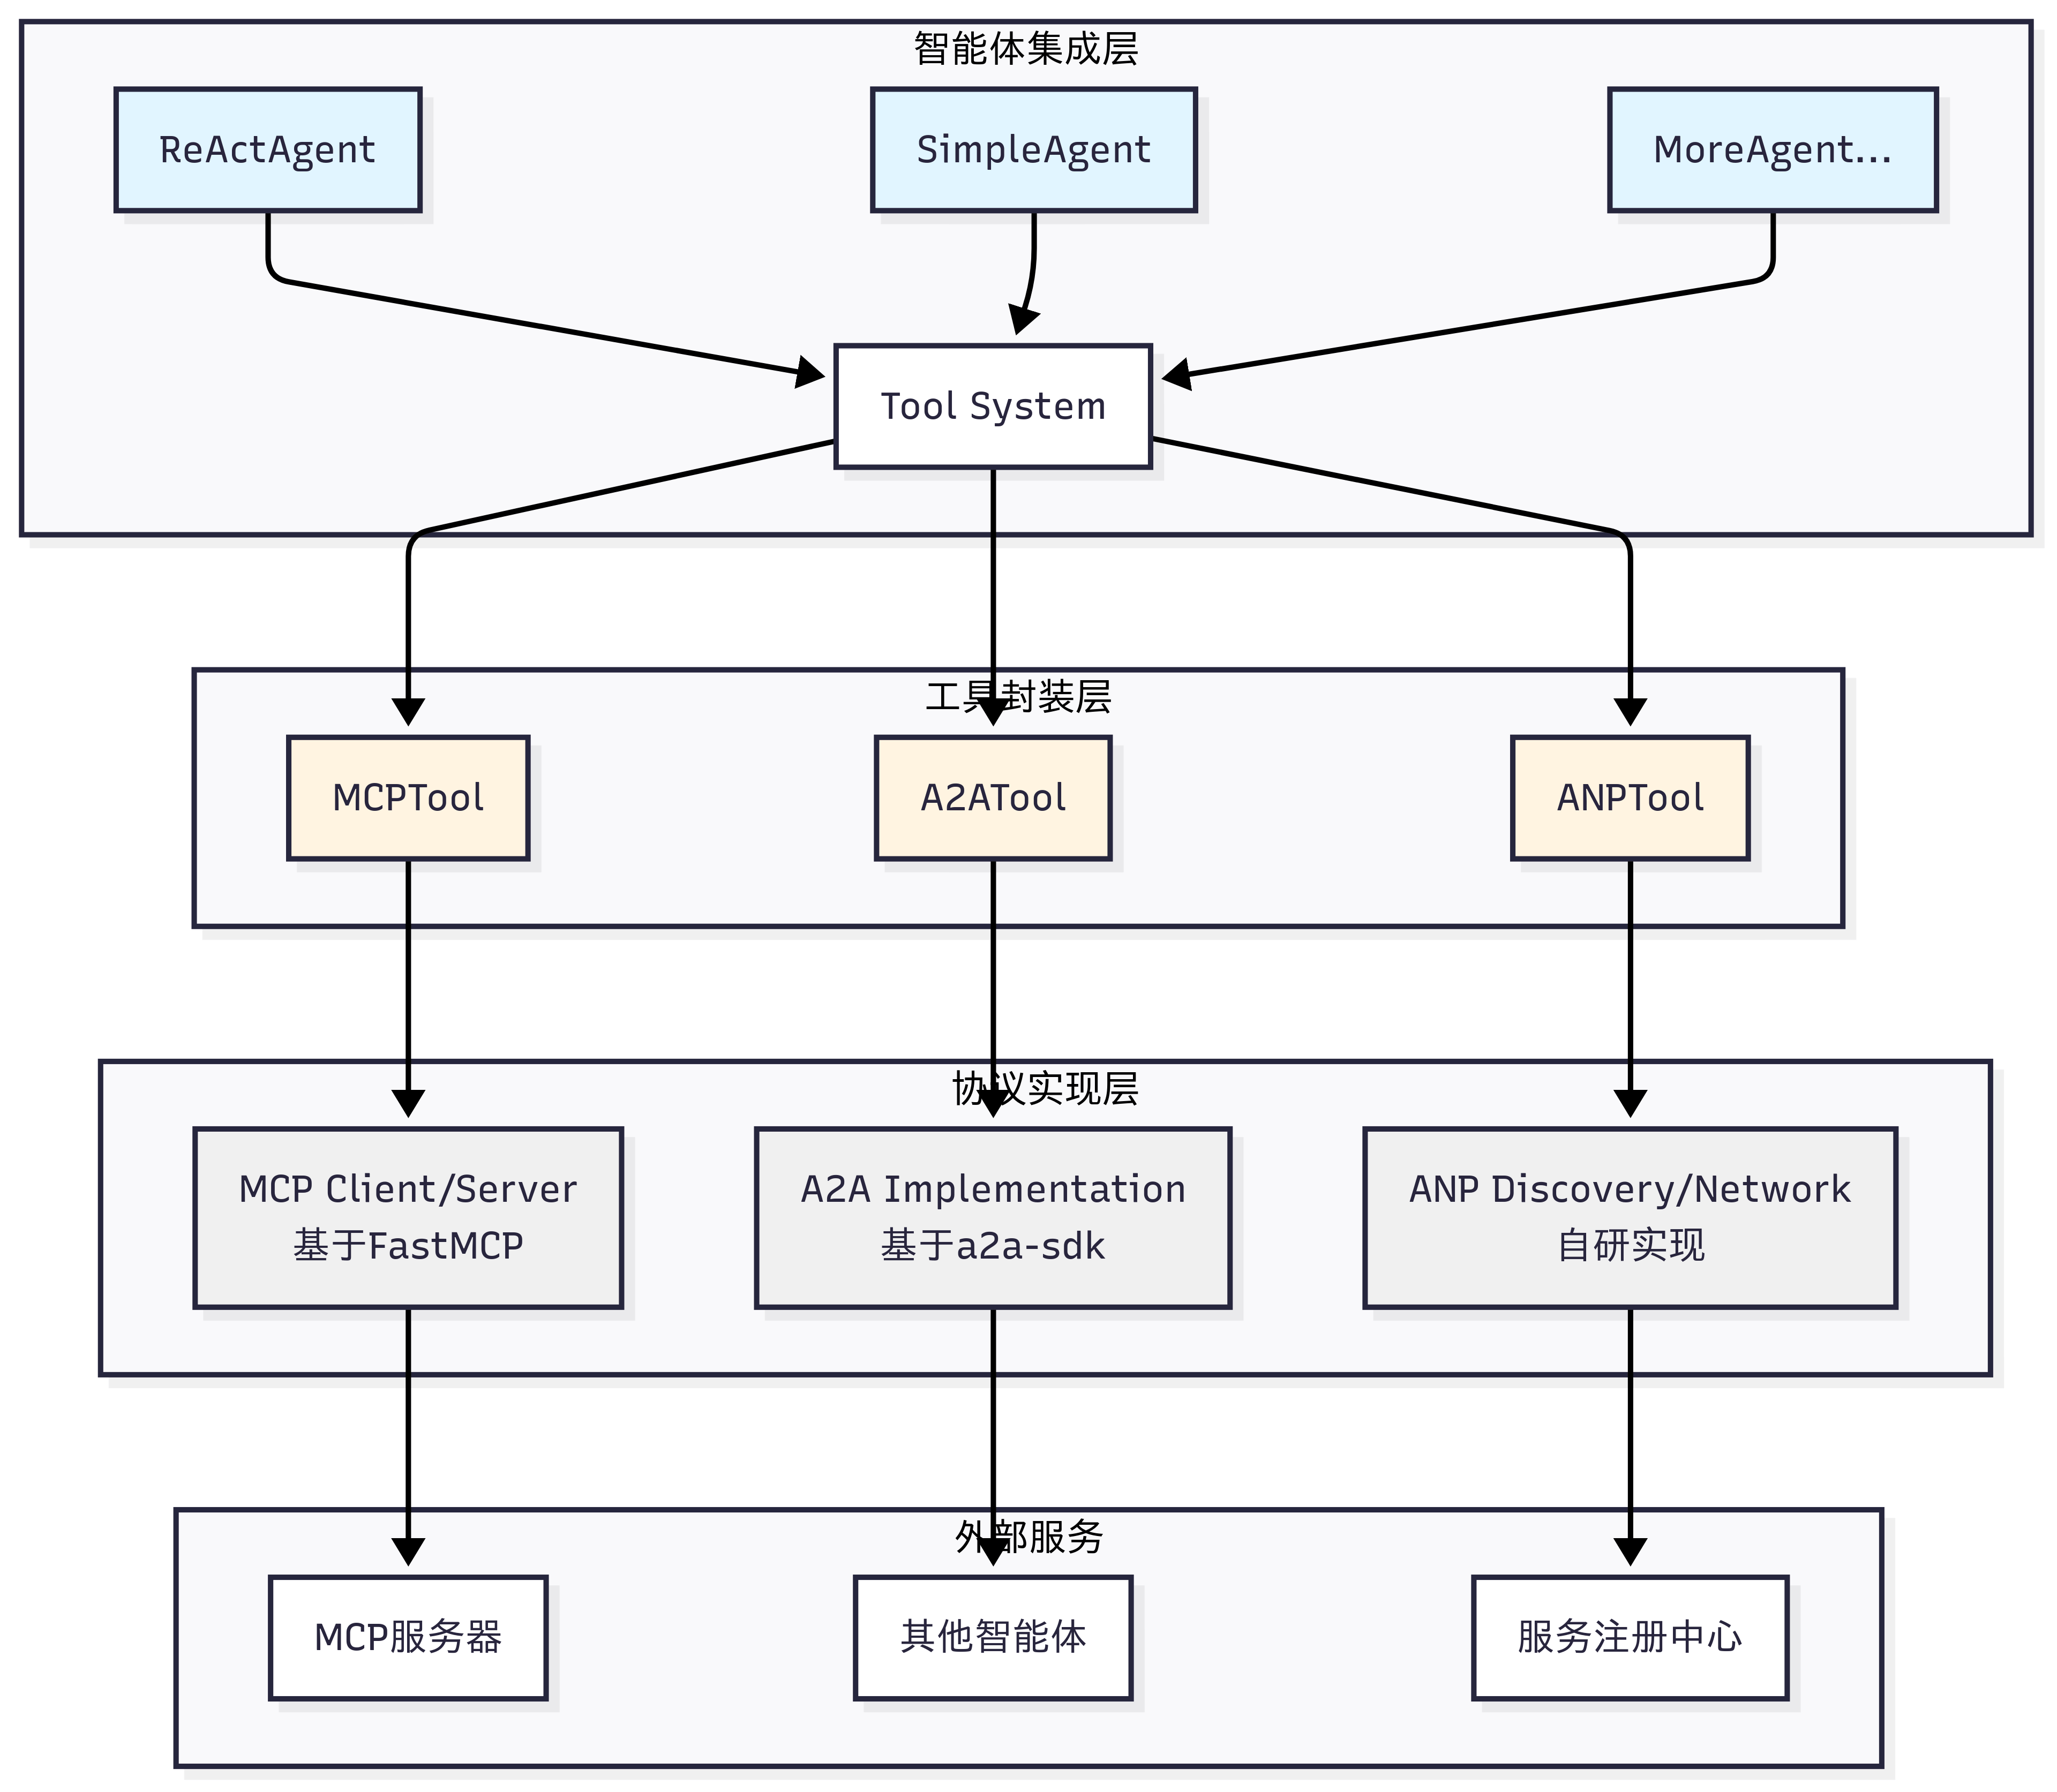
如图10.4 所示,HelloAgents 的通信协议架构采用三层设计,从底层到上层分别是:协议实现层、工具封装层和智能体集成层。
图4:HelloAgents 通信协议设计
(1)协议实现层 :这一层包含了三种协议的具体实现。MCP 基于 FastMCP 库实现,提供客户端和服务器功能;A2A 基于 Google 官方的 a2a-sdk 实现;ANP 是我们自研的轻量级实现,提供服务发现和网络管理功能,当然目前也有官方的实现 ,考虑到后期的迭代,因此这里只做概念的模拟。
(2)工具封装层 :这一层将协议实现封装成统一的 Tool 接口。MCPTool、A2ATool 和 ANPTool 都继承自 BaseTool,提供一致的 run() 方法。这种设计让智能体能够以相同的方式使用不同的协议。
(3)智能体集成层 :这一层是智能体与协议的集成点。所有的智能体(ReActAgent、SimpleAgent 等)都通过 Tool System 来使用协议工具,无需关心底层的协议细节。
1.4 本章学习目标与快速体验
让我们先看看第十章的学习内容:
protocols/ # 通信协议模块
├── mcp/ # MCP协议实现(Model Context Protocol)
│ ├── client.py # MCP客户端(支持5种传输方式)
│ ├── server.py # MCP服务器(FastMCP封装)
│ └── utils.py # 工具函数(create_context/parse_context)
├── a2a/ # A2A协议实现(Agent-to-Agent Protocol)
│ └── implementation.py # A2A服务器/客户端(基于a2a-sdk,可选依赖)
└── anp/ # ANP协议实现(Agent Network Protocol)
└── implementation.py # ANP服务发现/注册(概念性实现)
tools/builtin/ # 内置工具模块
└── protocol_tools.py # 协议工具包装器(MCPTool/A2ATool/ANPTool)
对于这一章的内容,主要是应用为主,学习目标是能拥有在自己项目中应用协议的能力。并且协议目前发展处于早期,所以无需花费太多精力去造轮子。在开始实战之前,让我们先准备好开发环境:
# 安装 HelloAgents 框架(第10章版本)
install "hello-agents[protocol]==0.2.2"
# 安装 NodeJS, 可以参考Additional-Chapter中的文档
让我们用最简单的代码体验一下三种协议的基本功能:
from hello_agents.tools import MCPTool , A2ATool , ANPTool
# 1. MCP:访问工具
mcp_tool = MCPTool ()
result = mcp_tool . run ({
"action" : "call_tool" ,
"tool_name" : "add" ,
"arguments" : { "a" : 10 , "b" : 20 }
})
print ( f "MCP计算结果: { result } " ) # 输出: 30.0
# 2. ANP:服务发现
anp_tool = ANPTool ()
anp_tool . run ({
"action" : "register_service" ,
"service_id" : "calculator" ,
"service_type" : "math" ,
"endpoint" : "http://localhost:8080"
})
services = anp_tool . run ({ "action" : "discover_services" })
print ( f "发现的服务: { services } " )
# 3. A2A:智能体通信
a2a_tool = A2ATool ( "http://localhost:5000" )
print ( "A2A工具创建成功" )
这个简单的示例展示了三种协议的核心功能。在接下来的章节中,我们将深入学习每种协议的详细用法和最佳实践。
2. MCP 协议实战
现在,让我们深入学习 MCP,掌握如何让智能体访问外部工具和资源。
2.1 MCP 协议概念介绍
(1)MCP:智能体的"USB-C"
想象一下,你的智能体可能需要同时做很多事情,例如:
读取本地文件系统的文档
查询 PostgreSQL 数据库
搜索 GitHub 上的代码
发送 Slack 消息
访问 Google Drive
传统方式下,你需要为每个服务编写适配器代码,处理不同的 API、认证方式、错误处理等。这不仅工作量大,而且难以维护。更重要的是,不同 LLM 平台的 function call 实现差异巨大,切换模型时需要重写大量代码。
MCP 的出现改变了这一切。它就像 USB-C 统一了各种设备的连接方式一样,MCP 统一了智能体与外部工具的交互方式 。无论你使用 Claude、GPT 还是其他模型,只要它们支持 MCP 协议,就能无缝访问相同的工具和资源。
(2)MCP 架构
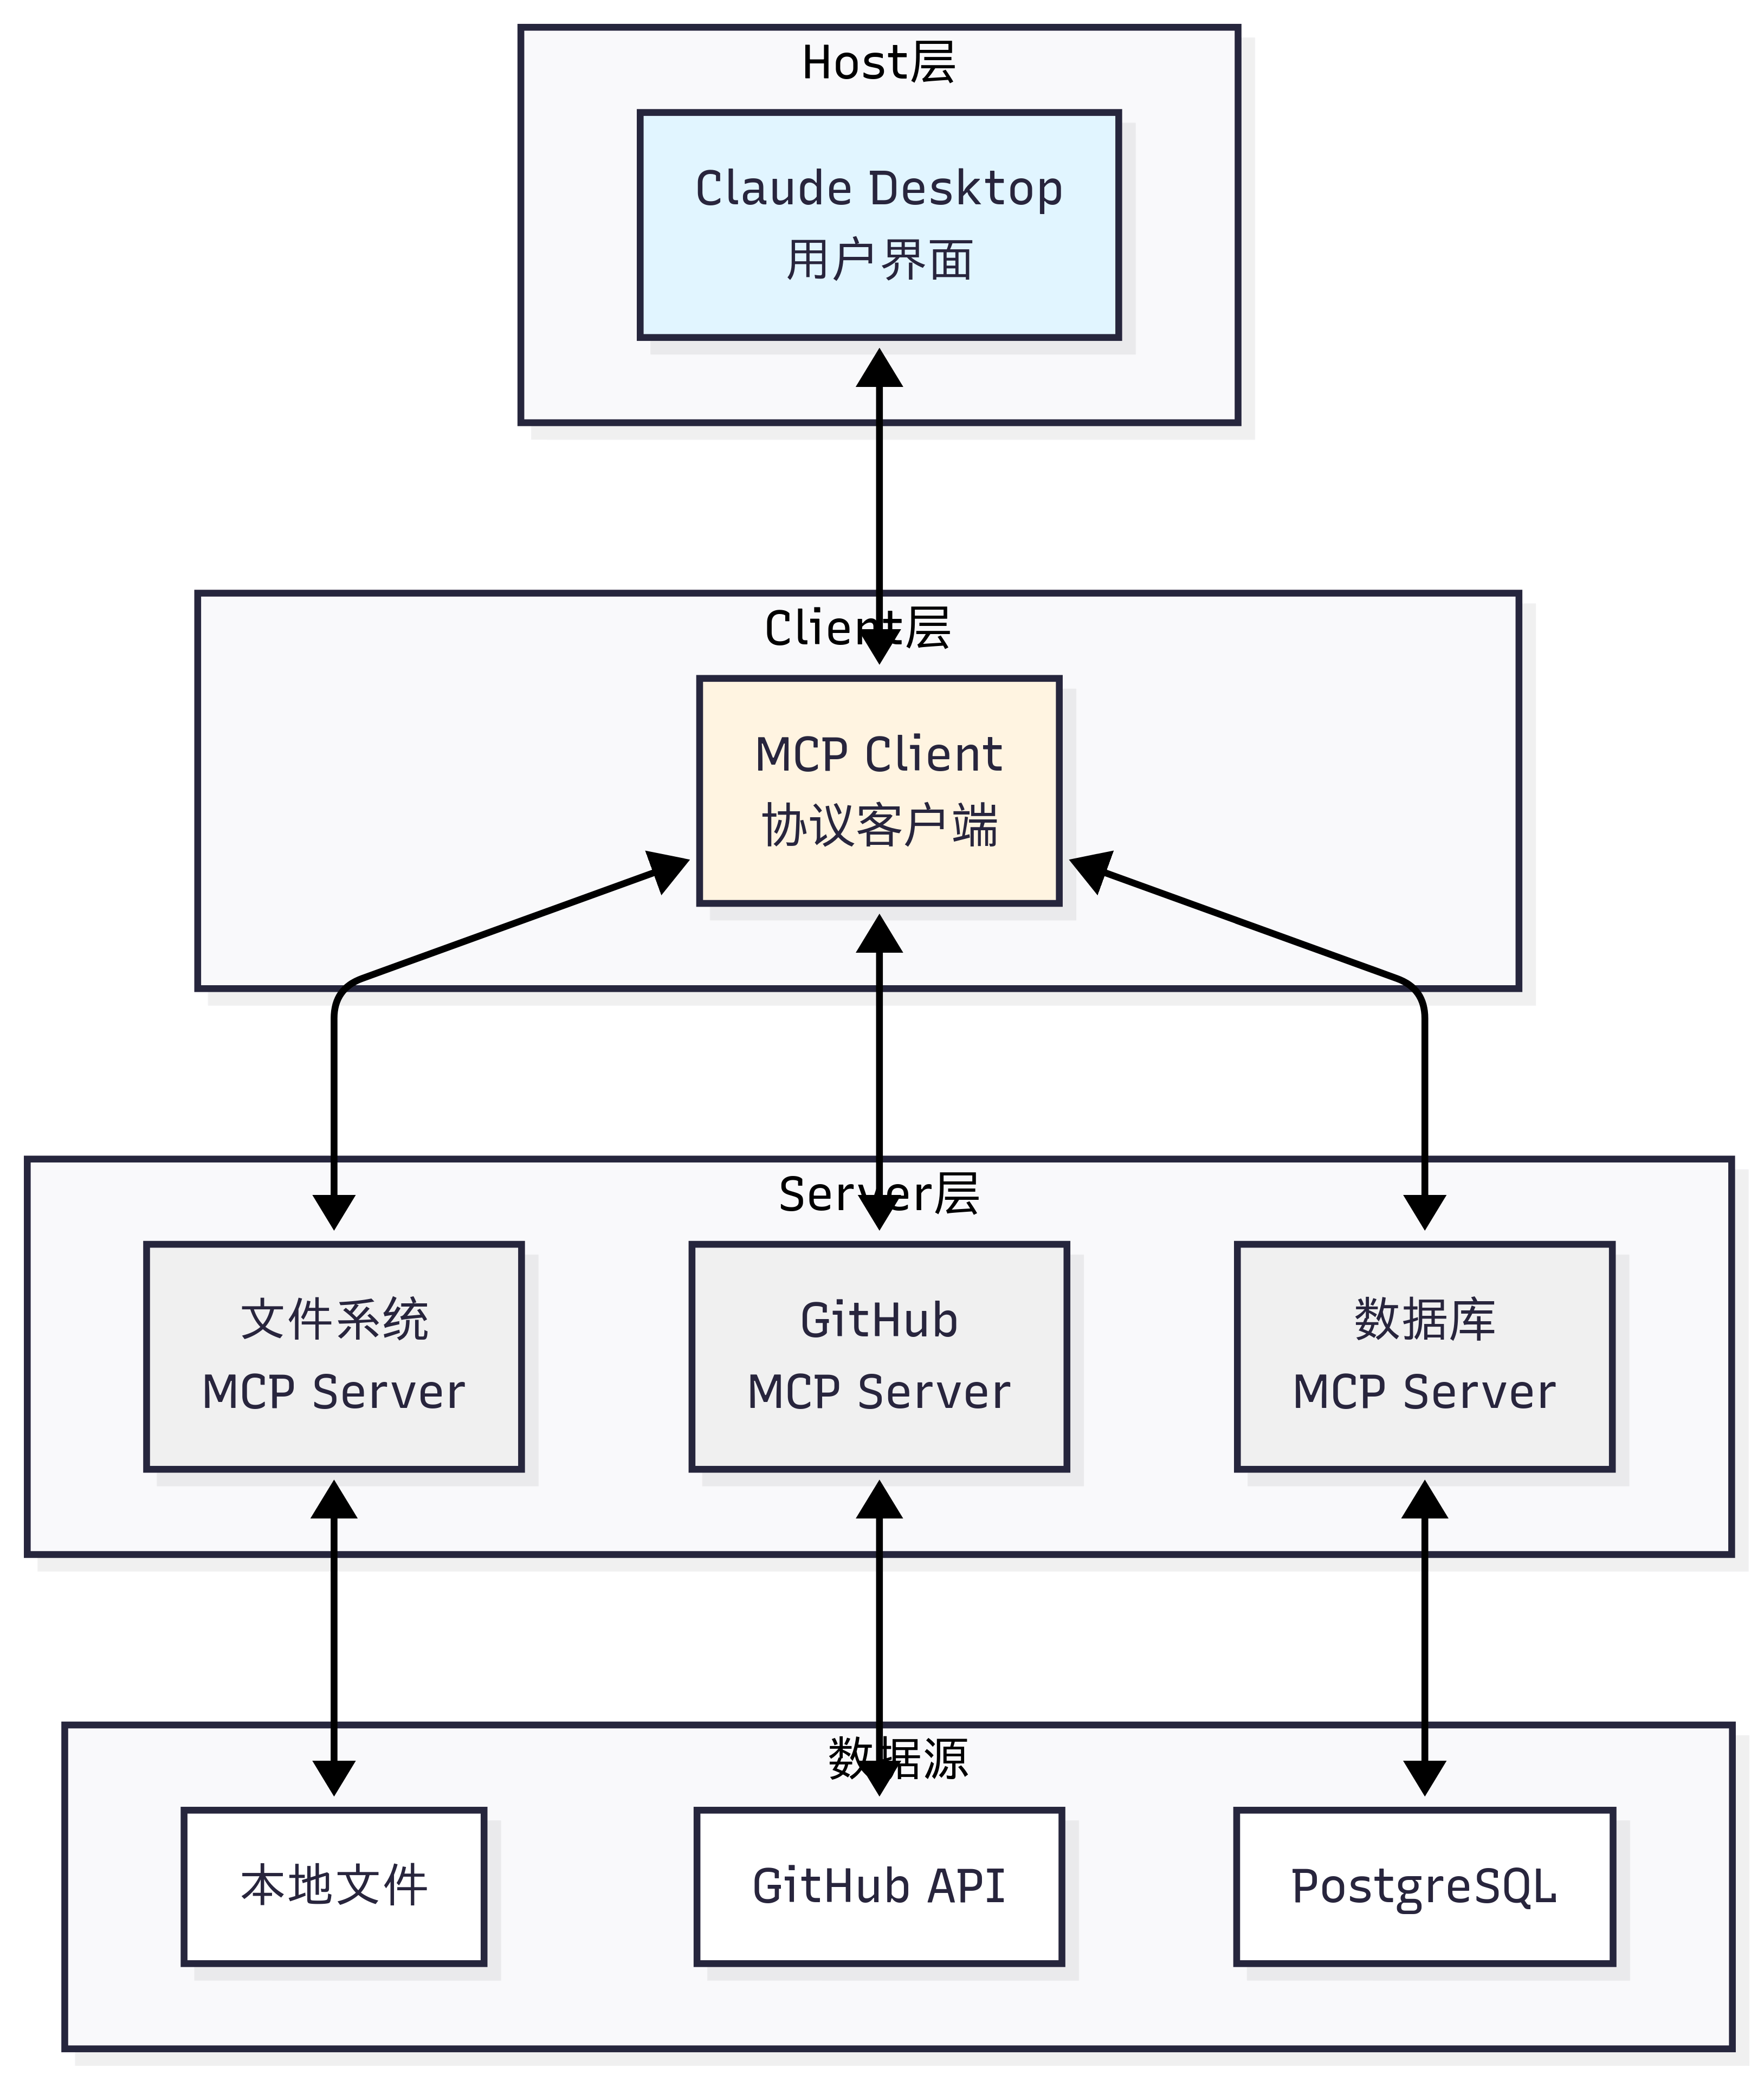
MCP 协议采用 Host、Client、Servers 三层架构设计,让我们通过图5 的场景来理解这些组件如何协同工作。
假设你正在使用 Claude Desktop 询问:"我桌面上有哪些文档?"
图5:MCP 案例演示
三层架构的职责:
Host(宿主层) :Claude Desktop 作为 Host,负责接收用户提问并与 Claude 模型交互。Host 是用户直接交互的界面,它管理整个对话流程。Client(客户端层) :当 Claude 模型决定需要访问文件系统时,Host 中内置的 MCP Client 被激活。Client 负责与适当的 MCP Server 建立连接,发送请求并接收响应。Server(服务器层) :文件系统 MCP Server 被调用,执行实际的文件扫描操作,访问桌面目录,并返回找到的文档列表。
**完整的交互流程:**用户问题 → Claude Desktop(Host) → Claude 模型分析 → 需要文件信息 → MCP Client 连接 → 文件系统 MCP Server → 执行操作 → 返回结果 → Claude 生成回答 → 显示在 Claude Desktop 上
这种架构设计的优势在于 关注点分离 :Host 专注于用户体验,Client 专注于协议通信,Server 专注于具体功能实现。开发者只需专注于开发对应的 MCP Server,无需关心 Host 和 Client 的实现细节。
(3)MCP 的核心能力
如表2 所示,MCP 协议提供了三大核心能力,构成完整的工具访问框架:
能力
说明
使用场景
示例
Tools(工具) 可执行的功能,类似函数调用
执行操作、处理数据
read_file, search_code, send_email
Resources(资源) 可访问的数据,类似文件系统
读取数据、订阅变化
文件内容、数据库记录、API响应
Prompts(提示) 预定义的提示模板
标准化任务、最佳实践
代码审查提示、文档生成提示
这三种能力的区别在于:Tools 是主动的 (执行操作),Resources 是被动的 (提供数据),Prompts 是指导性的 (提供模板)。
(4)MCP 的工作流程
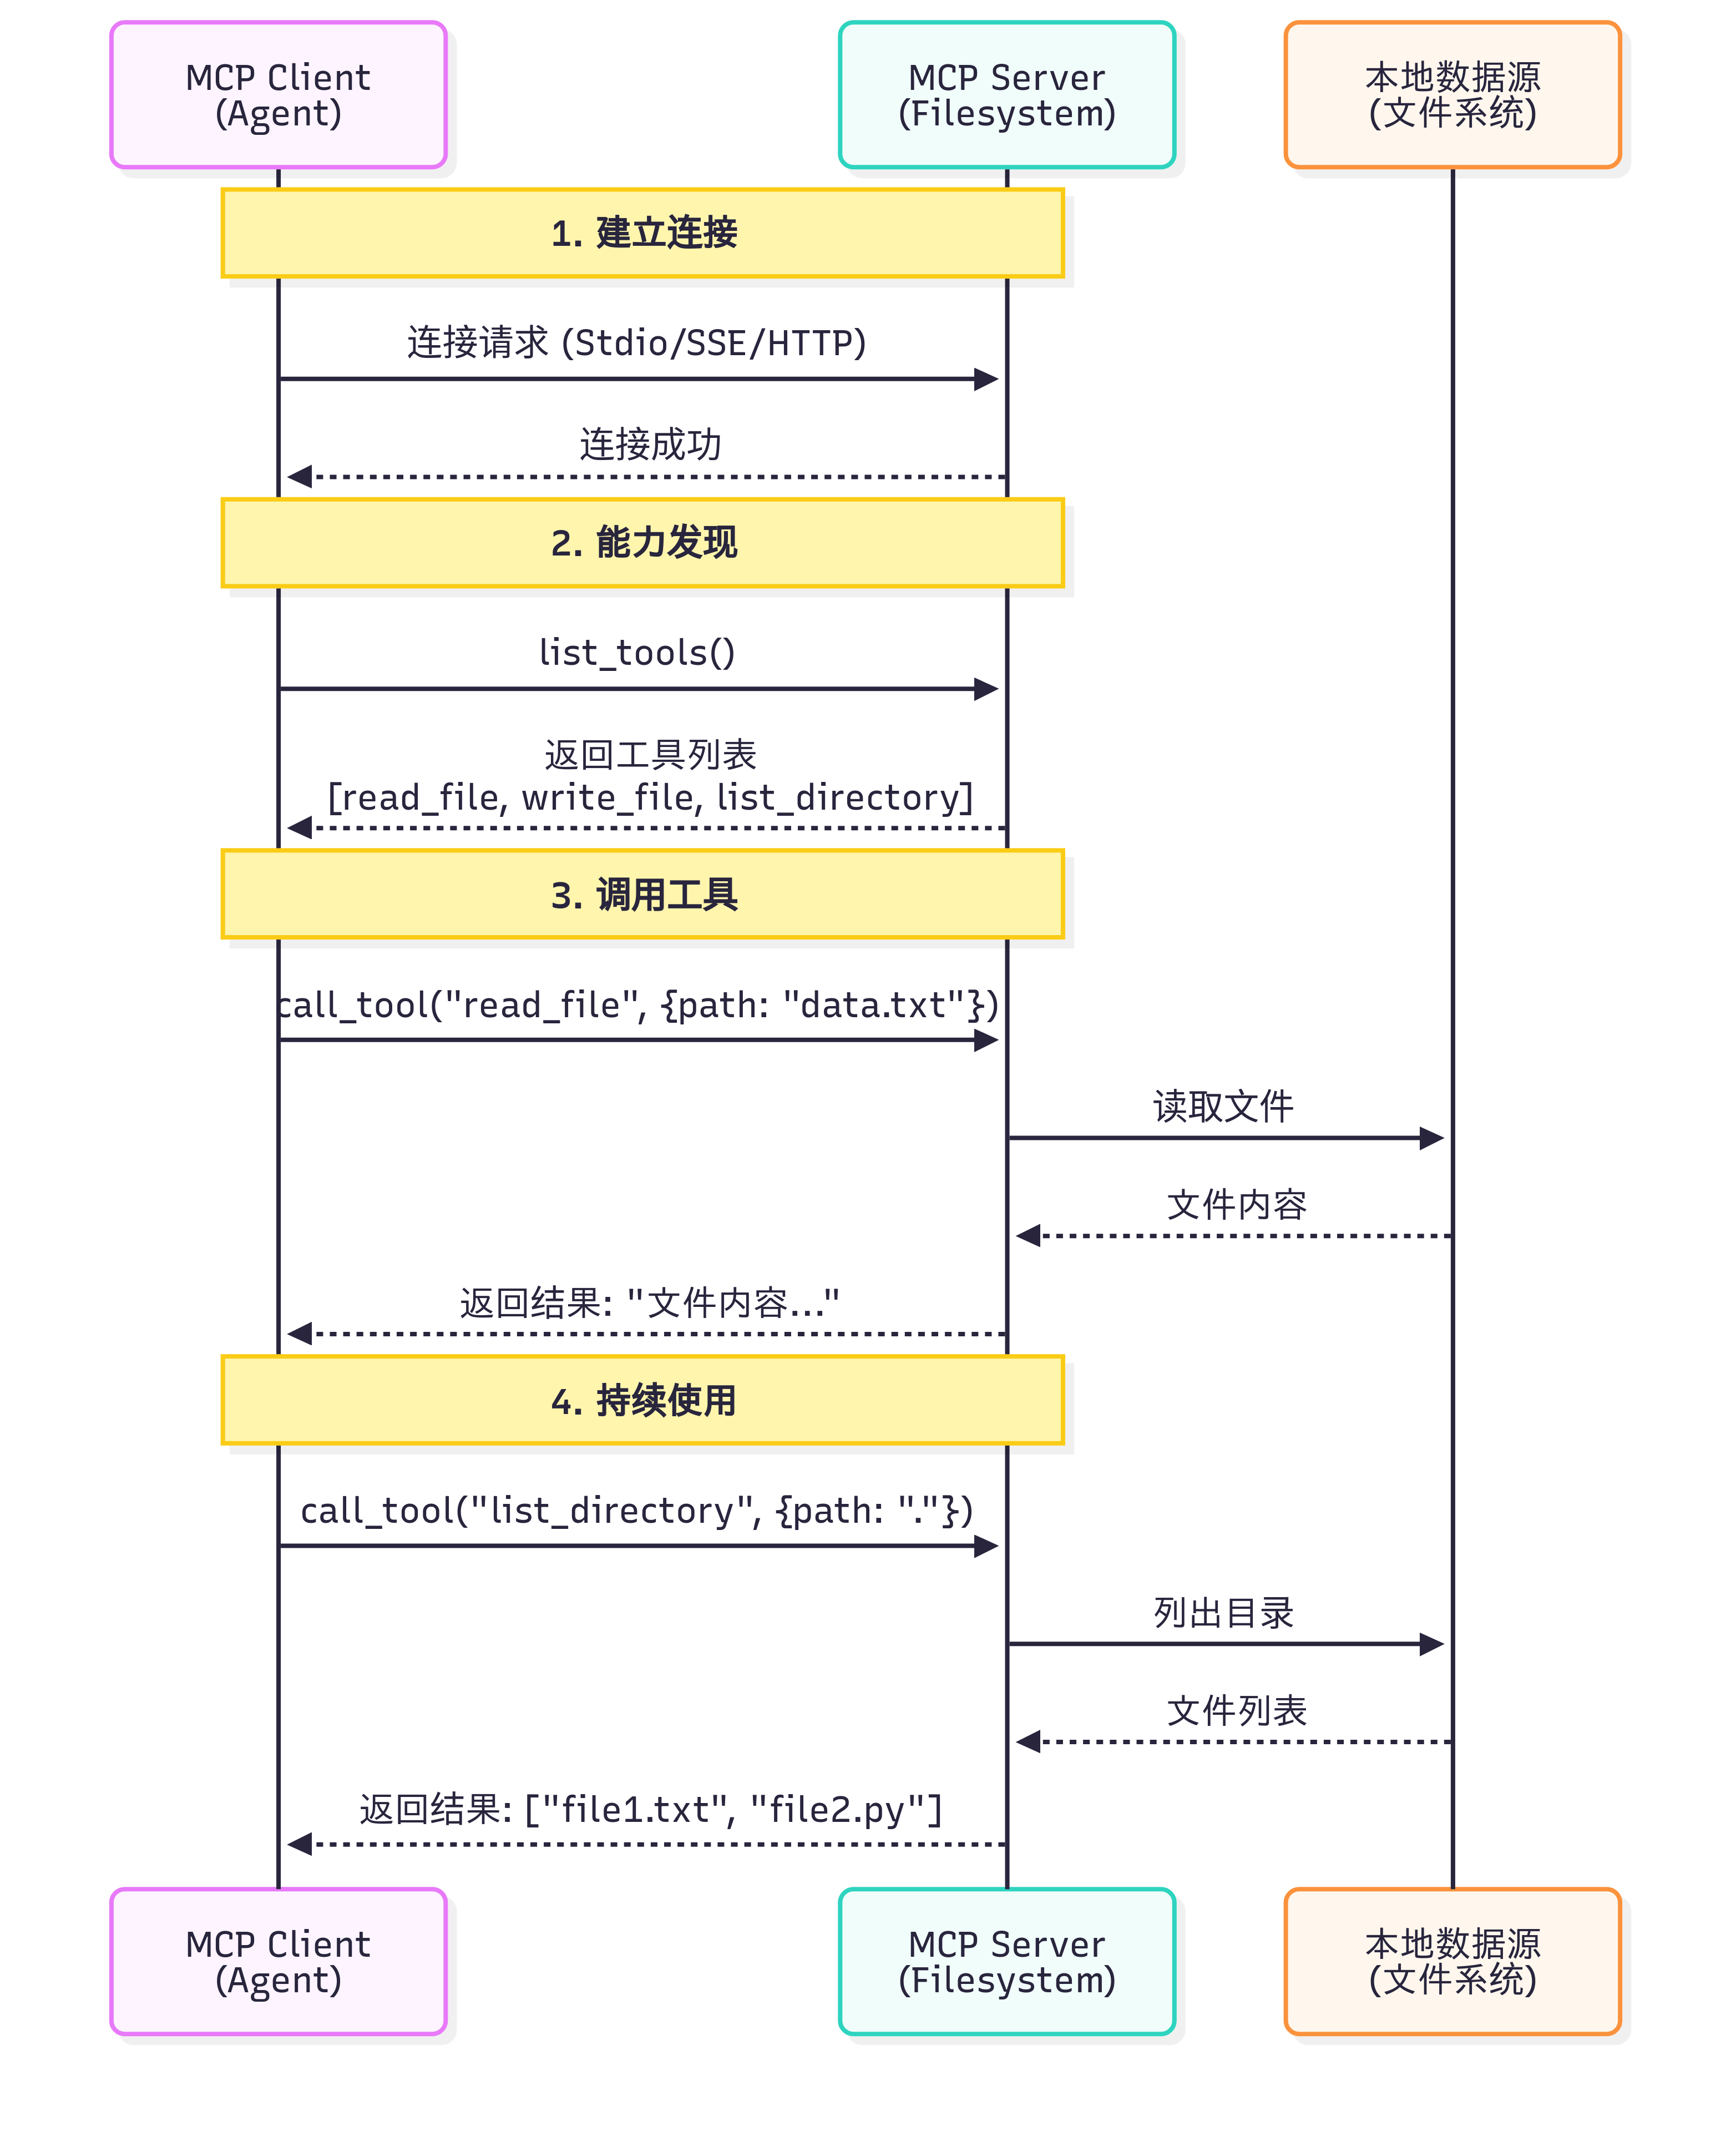
让我们通过一个具体例子来理解 MCP 的完整工作流程,如图6 所示:
图6:MCP 案例演示
一个关键问题是:Claude(或其他 LLM)是如何决定使用哪些工具的?
当用户提出问题时,完整的工具选择流程如下:
工具发现阶段 :MCP Client 连接到 Server 后,首先调用 list_tools() 获取所有可用工具的描述信息(包括工具名称、功能说明、参数定义)。
上下文构建 :Client 将工具列表转换为 LLM 能理解的格式,添加到系统提示词中。例如:
read_file( path: str) : 读取指定路径的文件内容
search_code( query: str, language: str) : 在代码库中搜索
模型推理 :LLM 分析用户问题和可用工具,决定是否需要调用工具以及调用哪个工具,这个决策基于工具的描述和当前对话上下文。
工具执行 :如果 LLM 决定使用工具,Client 通过 MCP Server 执行所选工具,获取结果。结果整合 :工具执行结果被送回给 LLM,大模型结合结果生成最终回答。
这个过程是完全自动化 的,LLM 会根据工具描述的质量来决定是否使用以及如何使用工具。因此,编写清晰、准确的工具描述至关重要。
(5)MCP 与 Function Calling 的差异
很多开发者会问:我已经在用 Function Calling 了,为什么还需要 MCP? 让我们通过表3 来理解它们的区别。
维度
Function Calling
MCP
本质 LLM的一种能力
标准化的通信协议
作用层级 模型层
基础设施层
解决问题 让LLM知道“如何调用函数”
让工具和模型“如何连接”
标准化 每个模型提供商实现不同
统一的协议规范
工具复用 需要为每个应用重写
社区工具可直接使用
这里我们以智能体需要访问 GitHub 仓库和本地文件系统为例子来详细对比同一个任务的两种实现
方式 1:使用 Function Calling
# 步骤1:为每个LLM提供商定义函数
# OpenAI格式
openai_tools = [
{
"type" : "function" ,
"function" : {
"name" : "search_github" ,
"description" : "搜索GitHub仓库" ,
"parameters" : {
"type" : "object" ,
"properties" : {
"query" : { "type" : "string" , "description" : "搜索关键词" }
},
"required" : [ "query" ]
}
}
}
]
# Claude格式
claude_tools = [
{
"name" : "search_github" ,
"description" : "搜索GitHub仓库" ,
"input_schema" : { # 注意:不是parameters
"type" : "object" ,
"properties" : {
"query" : { "type" : "string" , "description" : "搜索关键词" }
},
"required" : [ "query" ]
}
}
]
# 步骤2:自己实现工具函数
def search_github ( query ):
import requests
response = requests . get (
"https://api.github.com/search/repositories" ,
params = { "q" : query }
)
return response . json ()
# 步骤3:处理不同模型的响应格式
# OpenAI的响应
if response . choices [ 0 ] . message . tool_calls :
tool_call = response . choices [ 0 ] . message . tool_calls [ 0 ]
result = search_github ( ** json . loads ( tool_call . function . arguments ))
# Claude的响应
if response . content [ 0 ] . type == "tool_use" :
tool_use = response . content [ 0 ]
result = search_github ( ** tool_use . input )
方式 2:使用 MCP
from hello_agents.protocols import MCPClient
# 步骤1:连接到社区提供的MCP服务器(无需自己实现)
github_client = MCPClient ([
"npx" , "-y" , "@modelcontextprotocol/server-github"
])
fs_client = MCPClient ([
"npx" , "-y" , "@modelcontextprotocol/server-filesystem" , "."
])
# 步骤2:统一的调用方式(与模型无关)
async with github_client :
# 自动发现工具
tools = await github_client . list_tools ()
# 调用工具(标准化接口)
result = await github_client . call_tool (
"search_repositories" ,
{ "query" : "AI agents" }
)
# 步骤3:任何支持MCP的模型都能使用
# OpenAI、Claude、Llama等都使用相同的MCP客户端
首先需要明确的是,Function Calling 与 MCP 并非竞争关系,而是相辅相成的。Function Calling 是大语言模型的一项核心能力,它体现了模型内在的智能,使模型能够理解何时需要调用函数,并精准生成相应的调用参数。相对地,MCP 则扮演着基础设施协议的角色,它在工程层面解决了工具与模型如何连接的问题,通过标准化的方式来描述和调用工具。
我们可以用一个简单的类比来理解:Function Calling 相当于你学会了“如何打电话”这项技能,包括何时拨号、如何与对方沟通、何时挂断。而 MCP 则是那个全球统一的“电话通信标准”,确保了任何一部电话都能顺利地拨通另一部。
了解了它们之间的互补关系后,我们接下来看看如何在 HelloAgents 中使用 MCP 协议。
2.2 使用 MCP 客户端
HelloAgents 基于 FastMCP 2.0 实现了完整的 MCP 客户端功能。我们提供了异步和同步两种 API,以适应不同的使用场景。对于大多数应用,推荐使用异步 API,它能更好地处理并发请求和长时间运行的操作。下面我们将提供一个拆解的操作演示。
1)连接到 MCP 服务器
MCP 客户端支持多种连接方式,最常用的是 Stdio 模式(通过标准输入输出与本地进程通信):
import asyncio
from hello_agents.protocols import MCPClient
async def connect_to_server ():
# 方式1:连接到社区提供的文件系统服务器
# npx会自动下载并运行@modelcontextprotocol/server-filesystem包
client = MCPClient ([
"npx" , "-y" ,
"@modelcontextprotocol/server-filesystem" ,
"." # 指定根目录
])
# 使用async with确保连接正确关闭
async with client :
# 在这里使用client
tools = await client . list_tools ()
print ( f "可用工具: { [ t [ 'name' ] for t in tools ] } " )
# 方式2:连接到自定义的Python MCP服务器
client = MCPClient ([ "python" , "my_mcp_server.py" ])
async with client :
# 使用client...
pass
# 运行异步函数
asyncio . run ( connect_to_server ())
2)发现可用工具
连接成功后,第一步通常是查询服务器提供了哪些工具:
async def discover_tools ():
client = MCPClient ([ "npx" , "-y" , "@modelcontextprotocol/server-filesystem" , "." ])
async with client :
# 获取所有可用工具
tools = await client . list_tools ()
print ( f "服务器提供了 { len ( tools ) } 个工具:" )
for tool in tools :
print ( f " \n 工具名称: { tool [ 'name' ] } " )
print ( f "描述: { tool . get ( 'description' , '无描述' ) } " )
# 打印参数信息
if 'inputSchema' in tool :
schema = tool [ 'inputSchema' ]
if 'properties' in schema :
print ( "参数:" )
for param_name , param_info in schema [ 'properties' ] . items ():
param_type = param_info . get ( 'type' , 'any' )
param_desc = param_info . get ( 'description' , '' )
print ( f " - { param_name } ( { param_type } ): { param_desc } " )
asyncio . run ( discover_tools ())
# 输出示例:
# 服务器提供了 5 个工具:
#
# 工具名称: read_file
# 描述: 读取文件内容
# 参数:
# - path (string): 文件路径
#
# 工具名称: write_file
# 描述: 写入文件内容
# 参数:
# - path (string): 文件路径
# - content (string): 文件内容
3)调用工具
调用工具时,只需提供工具名称和符合 JSON Schema 的参数:
async def use_tools ():
client = MCPClient ([ "npx" , "-y" , "@modelcontextprotocol/server-filesystem" , "." ])
async with client :
# 读取文件
result = await client . call_tool ( "read_file" , { "path" : "my_README.md" })
print ( f "文件内容: \n { result } " )
# 列出目录
result = await client . call_tool ( "list_directory" , { "path" : "." })
print ( f "当前目录文件: { result } " )
# 写入文件
result = await client . call_tool ( "write_file" , {
"path" : "output.txt" ,
"content" : "Hello from MCP!"
})
print ( f "写入结果: { result } " )
asyncio . run ( use_tools ())
在这里提供一种更为安全的方式来调用 MCP 服务,可供参考:
async def safe_tool_call ():
client = MCPClient ([ "npx" , "-y" , "@modelcontextprotocol/server-filesystem" , "." ])
async with client :
try :
# 尝试读取可能不存在的文件
result = await client . call_tool ( "read_file" , { "path" : "nonexistent.txt" })
print ( result )
except Exception as e :
print ( f "工具调用失败: { e } " )
# 可以选择重试、使用默认值或向用户报告错误
asyncio . run ( safe_tool_call ())
4)访问资源
除了工具,MCP 服务器还可以提供资源(Resources):
# 列出可用资源
resources = client . list_resources ()
print ( f "可用资源: { [ r [ 'uri' ] for r in resources ] } " )
# 读取资源
resource_content = client . read_resource ( "file:///path/to/resource" )
print ( f "资源内容: { resource_content } " )
5)使用提示模板
MCP 服务器可以提供预定义的提示模板(Prompts):
# 列出可用提示
prompts = client . list_prompts ()
print ( f "可用提示: { [ p [ 'name' ] for p in prompts ] } " )
# 获取提示内容
prompt = client . get_prompt ( "code_review" , { "language" : "python" })
print ( f "提示内容: { prompt } " )
6)完整示例:使用 GitHub MCP 服务
让我们通过一个完整的例子来看如何使用社区提供的 GitHub MCP 服务,我们将采用封装好的 MCP Tools 来:
"""
GitHub MCP 服务示例
注意:需要设置环境变量
Windows: $env:GITHUB_PERSONAL_ACCESS_TOKEN="your_token_here"
Linux/macOS: export GITHUB_PERSONAL_ACCESS_TOKEN="your_token_here"
"""
from hello_agents.tools import MCPTool
# 创建 GitHub MCP 工具
github_tool = MCPTool (
server_command = [ "npx" , "-y" , "@modelcontextprotocol/server-github" ]
)
# 1. 列出可用工具
print ( "📋 可用工具:" )
result = github_tool . run ({ "action" : "list_tools" })
print ( result )
# 2. 搜索仓库
print ( " \n 🔍 搜索仓库:" )
result = github_tool . run ({
"action" : "call_tool" ,
"tool_name" : "search_repositories" ,
"arguments" : {
"query" : "AI agents language:python" ,
"page" : 1 ,
"perPage" : 3
}
})
print ( result )
2.3 MCP 传输方式详解
MCP 协议的一个重要特性是 传输层无关性 (Transport Agnostic),这意味着 MCP 协议本身不依赖于特定的传输方式,可以在不同的通信通道上运行。HelloAgents 基于 FastMCP 2.0,提供了完整的传输方式支持,让你可以根据实际场景选择最合适的传输模式。
1)传输方式概览
HelloAgents 的MCPClient支持五种传输方式,每种都有不同的使用场景,如表4 所示:
传输方式
适用场景
优点
缺点
Memory 单元测试、快速原型
最快、无网络开销
仅限同进程
Stdio 本地开发、命令行工具
简单、无需网络配置
仅限本地、可能有兼容性问题
HTTP 生产环境、远程服务
通用、防火墙友好
无流式支持、延迟较高
SSE 实时通信、流式响应
支持服务器推送
单向通信、需要HTTP服务器
StreamableHTTP 流式HTTP通信
双向流式、HTTP兼容
需要特定服务器支持
2)传输方式使用示例
from hello_agents.tools import MCPTool
# 1. Memory Transport - 内存传输(用于测试)
# 不指定任何参数,使用内置演示服务器
mcp_tool = MCPTool ()
# 2. Stdio Transport - 标准输入输出传输(本地开发)
# 使用命令列表启动本地服务器
mcp_tool = MCPTool ( server_command = [ "python" , "examples/mcp_example_server.py" ])
# 3. Stdio Transport with Args - 带参数的命令传输
# 可以传递额外参数
mcp_tool = MCPTool ( server_command = [ "python" , "examples/mcp_example_server.py" , "--debug" ])
# 4. Stdio Transport - 社区服务器(npx方式)
# 使用npx启动社区MCP服务器
mcp_tool = MCPTool ( server_command = [ "npx" , "-y" , "@modelcontextprotocol/server-filesystem" , "." ])
# 5. HTTP/SSE/StreamableHTTP Transport
# 注意:MCPTool主要用于Stdio和Memory传输
# 对于HTTP/SSE等远程传输,建议直接使用MCPClient
3)Memory Transport - 内存传输
适用场景:单元测试、快速原型开发
from hello_agents.tools import MCPTool
# 使用内置演示服务器(Memory传输)
mcp_tool = MCPTool ()
# 列出可用工具
result = mcp_tool . run ({ "action" : "list_tools" })
print ( result )
# 调用工具
result = mcp_tool . run ({
"action" : "call_tool" ,
"tool_name" : "add" ,
"arguments" : { "a" : 10 , "b" : 20 }
})
print ( result )
4)Stdio Transport - 标准输入输出传输
适用场景:本地开发、调试、Python 脚本服务器
from hello_agents.tools import MCPTool
# 方式1:使用自定义Python服务器
mcp_tool = MCPTool ( server_command = [ "python" , "my_mcp_server.py" ])
# 方式2:使用社区服务器(文件系统)
mcp_tool = MCPTool ( server_command = [ "npx" , "-y" , "@modelcontextprotocol/server-filesystem" , "." ])
# 列出工具
result = mcp_tool . run ({ "action" : "list_tools" })
print ( result )
# 调用工具
result = mcp_tool . run ({
"action" : "call_tool" ,
"tool_name" : "read_file" ,
"arguments" : { "path" : "README.md" }
})
print ( result )
5)HTTP Transport - HTTP 传输
适用场景:生产环境、远程服务、微服务架构
# 注意:MCPTool 主要用于 Stdio 和 Memory 传输
# 对于 HTTP/SSE 等远程传输,建议使用底层的 MCPClient
import asyncio
from hello_agents.protocols import MCPClient
async def test_http_transport ():
# 连接到远程 HTTP MCP 服务器
client = MCPClient ( "http://api.example.com/mcp" )
async with client :
# 获取服务器信息
tools = await client . list_tools ()
print ( f "远程服务器工具: { len ( tools ) } 个" )
# 调用远程工具
result = await client . call_tool ( "process_data" , {
"data" : "Hello, World!" ,
"operation" : "uppercase"
})
print ( f "远程处理结果: { result } " )
# 注意:需要实际的 HTTP MCP 服务器
# asyncio.run(test_http_transport())
6)SSE Transport - Server-Sent Events 传输
适用场景:实时通信、流式处理、长连接
# 注意:MCPTool 主要用于 Stdio 和 Memory 传输
# 对于 SSE 传输,建议使用底层的 MCPClient
import asyncio
from hello_agents.protocols import MCPClient
async def test_sse_transport ():
# 连接到 SSE MCP 服务器
client = MCPClient (
"http://localhost:8080/sse" ,
transport_type = "sse"
)
async with client :
# SSE 特别适合流式处理
result = await client . call_tool ( "stream_process" , {
"input" : "大量数据处理请求" ,
"stream" : True
})
print ( f "流式处理结果: { result } " )
# 注意:需要支持 SSE 的 MCP 服务器
# asyncio.run(test_sse_transport())
7)StreamableHTTP Transport - 流式 HTTP 传输
适用场景:需要双向流式通信的 HTTP 场景
# 注意:MCPTool 主要用于 Stdio 和 Memory 传输
# 对于 StreamableHTTP 传输,建议使用底层的 MCPClient
import asyncio
from hello_agents.protocols import MCPClient
async def test_streamable_http_transport ():
# 连接到 StreamableHTTP MCP 服务器
client = MCPClient (
"http://localhost:8080/mcp" ,
transport_type = "streamable_http"
)
async with client :
# 支持双向流式通信
tools = await client . list_tools ()
print ( f "StreamableHTTP 服务器工具: { len ( tools ) } 个" )
# 注意:需要支持 StreamableHTTP 的 MCP 服务器
# asyncio.run(test_streamable_http_transport())
2.4 在智能体中使用 MCP 工具
前面我们学习了如何直接使用 MCP 客户端。但在实际应用中,我们更希望让智能体自动 调用 MCP 工具,而不是手动编写调用代码。HelloAgents 提供了MCPTool包装器,让 MCP 服务器无缝集成到智能体的工具链中。
(1)MCP 工具的自动展开机制
HelloAgents 的MCPTool有一个特性:自动展开 。当你添加一个 MCP 工具到 Agent 时,它会自动将 MCP 服务器提供的所有工具展开为独立的工具,让 Agent 可以像调用普通工具一样调用它们。
方式 1:使用内置演示服务器
我们在之前实现过计算器的工具函数,在这里将他转化为 MCP 的服务。这是最简单的使用方式。
from hello_agents import SimpleAgent , HelloAgentsLLM
from hello_agents.tools import MCPTool
agent = SimpleAgent ( name = "助手" , llm = HelloAgentsLLM ())
# 无需任何配置,自动使用内置演示服务器
mcp_tool = MCPTool ( name = "calculator" )
agent . add_tool ( mcp_tool )
# ✅ MCP工具 'calculator' 已展开为 6 个独立工具
# 智能体可以直接使用展开后的工具
response = agent . run ( "计算 25 乘以 16" )
print ( response ) # 输出:25 乘以 16 的结果是 400
自动展开后的工具 :
calculator_add - 加法计算器calculator_subtract - 减法计算器calculator_multiply - 乘法计算器calculator_divide - 除法计算器calculator_greet - 友好问候calculator_get_system_info - 获取系统信息
Agent 调用时只需提供参数,例如:[TOOL_CALL:calculator_multiply:a=25,b=16],系统会自动处理类型转换和 MCP 调用。
方式 2:连接外部 MCP 服务器
在实际项目中,你需要连接到功能更强大的 MCP 服务器。这些服务器可以是:
- 社区提供的官方服务器 (如文件系统、GitHub、数据库等)
- 你自己编写的自定义服务器 (封装业务逻辑)
from hello_agents import SimpleAgent , HelloAgentsLLM
from hello_agents.tools import MCPTool
agent = SimpleAgent ( name = "文件助手" , llm = HelloAgentsLLM ())
# 示例1:连接到社区提供的文件系统服务器
fs_tool = MCPTool (
name = "filesystem" , # 指定唯一名称
description = "访问本地文件系统" ,
server_command = [ "npx" , "-y" , "@modelcontextprotocol/server-filesystem" , "." ]
)
agent . add_tool ( fs_tool )
# 示例2:连接到自定义的 Python MCP 服务器
# 关于如何编写自定义MCP服务器,请参考10.5章节
custom_tool = MCPTool (
name = "custom_server" , # 使用不同的名称
description = "自定义业务逻辑服务器" ,
server_command = [ "python" , "my_mcp_server.py" ]
)
agent . add_tool ( custom_tool )
# Agent现在可以自动使用这些工具!
response = agent . run ( "请读取my_README.md文件,并总结其中的主要内容" )
print ( response )
当使用多个 MCP 服务器时,务必为每个 MCPTool 指定不同的 name,这个 name 会作为前缀添加到展开的工具名前,避免冲突。例如:name="fs" 会展开为 fs_read_file、fs_write_file 等。如果你需要编写自己的 MCP 服务器来封装特定的业务逻辑,请参考 10.5 节内容。
(2)MCP 工具自动展开的工作原理
理解自动展开机制有助于你更好地使用 MCP 工具。让我们深入了解它是如何工作的:
# 用户代码
fs_tool = MCPTool ( name = "fs" , server_command = [ ... ])
agent . add_tool ( fs_tool )
# 内部发生的事情:
# 1. MCPTool连接到服务器,发现14个工具
# 2. 为每个工具创建包装器:
# - fs_read_text_file (参数: path, tail, head)
# - fs_write_file (参数: path, content)
# - ...
# 3. 注册到Agent的工具注册表
# Agent调用
response = agent . run ( "读取README.md" )
# Agent内部:
# 1. 识别需要调用 fs_read_text_file
# 2. 生成参数:path=README.md
# 3. 包装器转换为MCP格式:
# {"action": "call_tool", "tool_name": "read_text_file", "arguments": {"path": "README.md"}}
# 4. 调用MCP服务器
# 5. 返回文件内容
系统会根据工具的参数定义自动转换类型:
# Agent调用计算器
agent . run ( "计算 25 乘以 16" )
# Agent生成:a=25,b=16 (字符串)
# 系统自动转换为:{"a": 25.0, "b": 16.0} (数字)
# MCP服务器接收到正确的数字类型
(3)实战案例:智能文档助手
让我们构建一个完整的智能文档助手,这里我们用一个简单的多智能体编排进行演示:
"""
多Agent协作的智能文档助手
使用两个SimpleAgent分工协作:
- Agent1:GitHub搜索专家
- Agent2:文档生成专家
"""
from hello_agents import SimpleAgent , HelloAgentsLLM
from hello_agents.tools import MCPTool
from dotenv import load_dotenv
# 加载.env文件中的环境变量
load_dotenv ( dotenv_path = "../HelloAgents/.env" )
print ( "=" * 70 )
print ( "多Agent协作的智能文档助手" )
print ( "=" * 70 )
# ============================================================
# Agent 1: GitHub搜索专家
# ============================================================
print ( " \n 【步骤1】创建GitHub搜索专家..." )
github_searcher = SimpleAgent (
name = "GitHub搜索专家" ,
llm = HelloAgentsLLM (),
system_prompt = """你是一个GitHub搜索专家。
你的任务是搜索GitHub仓库并返回结果。
请返回清晰、结构化的搜索结果,包括:
- 仓库名称
- 简短描述
保持简洁,不要添加额外的解释。"""
)
# 添加GitHub工具
github_tool = MCPTool (
name = "gh" ,
server_command = [ "npx" , "-y" , "@modelcontextprotocol/server-github" ]
)
github_searcher . add_tool ( github_tool )
# ============================================================
# Agent 2: 文档生成专家
# ============================================================
print ( " \n 【步骤2】创建文档生成专家..." )
document_writer = SimpleAgent (
name = "文档生成专家" ,
llm = HelloAgentsLLM (),
system_prompt = """你是一个文档生成专家。
你的任务是根据提供的信息生成结构化的Markdown报告。
报告应该包括:
- 标题
- 简介
- 主要内容(分点列出,包括项目名称、描述等)
- 总结
请直接输出完整的Markdown格式报告内容,不要使用工具保存。"""
)
# 添加文件系统工具
fs_tool = MCPTool (
name = "fs" ,
server_command = [ "npx" , "-y" , "@modelcontextprotocol/server-filesystem" , "." ]
)
document_writer . add_tool ( fs_tool )
# ============================================================
# 执行任务
# ============================================================
print ( " \n " + "=" * 70 )
print ( "开始执行任务..." )
print ( "=" * 70 )
try :
# 步骤1:GitHub搜索
print ( " \n 【步骤3】Agent1 搜索GitHub..." )
search_task = "搜索关于'AI agent'的GitHub仓库,返回前5个最相关的结果"
search_results = github_searcher . run ( search_task )
print ( " \n 搜索结果:" )
print ( "-" * 70 )
print ( search_results )
print ( "-" * 70 )
# 步骤2:生成报告
print ( " \n 【步骤4】Agent2 生成报告..." )
report_task = f """
根据以下GitHub搜索结果,生成一份Markdown格式的研究报告:
{ search_results }
报告要求:
1. 标题:# AI Agent框架研究报告
2. 简介:说明这是关于AI Agent的GitHub项目调研
3. 主要发现:列出找到的项目及其特点(包括名称、描述等)
4. 总结:总结这些项目的共同特点
请直接输出完整的Markdown格式报告。
"""
report_content = document_writer . run ( report_task )
print ( " \n 报告内容:" )
print ( "=" * 70 )
print ( report_content )
print ( "=" * 70 )
# 步骤3:保存报告
print ( " \n 【步骤5】保存报告到文件..." )
import os
try :
with open ( "report.md" , "w" , encoding = "utf-8" ) as f :
f . write ( report_content )
print ( "✅ 报告已保存到 report.md" )
# 验证文件
file_size = os . path . getsize ( "report.md" )
print ( f "✅ 文件大小: { file_size } 字节" )
except Exception as e :
print ( f "❌ 保存失败: { e } " )
print ( " \n " + "=" * 70 )
print ( "任务完成!" )
print ( "=" * 70 )
except Exception as e :
print ( f " \n ❌ 错误: { e } " )
import traceback
traceback . print_exc ()
github_searcher会在这个过程中调用gh_search_repositories搜索 GitHub 项目。得到的结果会返回给document_writer当做输入,进一步指导报告的生成,最后保存报告到 report.md。
2.5 MCP 社区生态
MCP 协议的一个巨大优势是丰富的社区生态 。Anthropic 和社区开发者已经创建了大量现成的 MCP 服务器,涵盖文件系统、数据库、API 服务等各种场景。这意味着你不需要从零开始编写工具适配器,可以直接使用这些经过验证的服务器。
这里给出 MCP 社区的三个资源库:
Awesome MCP Servers :
社区维护的 MCP 服务器精选列表
包含各种第三方服务器
按功能分类,易于查找
MCP Servers Website
官方 MCP 服务器目录网站
提供搜索和筛选功能
包含使用说明和示例
Official MCP Servers
Anthropic 官方维护的服务器
质量最高、文档最完善
包含常用服务的实现
表5 和 6 给出常用的官方 MCP 服务器和社区热门 MCP 服务器:
表5 官方 MCP 服务器:
服务器名称
功能
NPM包名
使用场景
filesystem 文件系统访问
@modelcontextprotocol/server-filesystem读写本地文件、目录操作
github GitHub API
@modelcontextprotocol/server-github搜索仓库、读取代码
postgres PostgreSQL数据库
@modelcontextprotocol/server-postgres数据库查询、数据分析
sqlite SQLite数据库
@modelcontextprotocol/server-sqlite轻量级数据库操作
slack Slack消息
@modelcontextprotocol/server-slack发送消息、读取频道
google-drive Google Drive
@modelcontextprotocol/server-google-drive访问云端文件
brave-search Brave搜索
@modelcontextprotocol/server-brave-search网页搜索、实时信息获取
fetch 网页抓取
@modelcontextprotocol/server-fetch获取网页内容、提取数据
表6 社区热门 MCP 服务器:
服务器名称
功能
包名/仓库
炫酷特性
Playwright 浏览器自动化
@playwright/mcp自动化网页交互、截图、填表单
Puppeteer 浏览器控制
mcp-server-puppeteer网页爬取、PDF生成
Screenpipe 屏幕录制
mediar-ai/screenpipe本地屏幕/音频捕获、时间戳索引、语义搜索
Obsidian 笔记管理
calclavia/mcp-obsidian读取和搜索Markdown笔记、知识库管理
Notion 协作文档
Badhansen/notion-mcp管理待办事项、数据库操作
Jira 项目管理
nguyenvanduocit/jira-mcpIssue管理、Sprint规划、工作流
Tavily AI搜索
kshern/mcp-tavily专为AI优化的搜索API
YouTube 视频处理
anaisbetts/mcp-youtube获取字幕、视频信息、转录内容
Spotify 音乐控制
marcelmarais/Spotify播放控制、播放列表管理
Wolfram Alpha 计算知识
ricocf/mcp-wolframalpha数学计算、科学数据、实时知识
Sentry 错误追踪
getsentry/sentry-mcp错误监控、性能分析
Grafana 可视化监控
grafana/mcp-grafana查询仪表板、数据源查询
以下是一些特别有趣的案例 TODO 可供参考:
自动化网页测试(Playwright)
# Agent可以自动:
# - 打开浏览器访问网站
# - 填写表单并提交
# - 截图验证结果
# - 生成测试报告
playwright_tool = MCPTool (
name = "playwright" ,
server_command = [ "npx" , "-y" , "@playwright/mcp" ]
)
智能笔记助手(Obsidian + Perplexity)
# Agent可以:
# - 搜索最新技术资讯(Perplexity)
# - 整理成结构化笔记
# - 保存到Obsidian知识库
# - 自动建立笔记间的链接
项目管理自动化(Jira + GitHub)
# Agent可以:
# - 从GitHub Issue创建Jira任务
# - 同步代码提交到Jira
# - 自动更新Sprint进度
# - 生成项目报告
内容创作工作流(YouTube + Notion + Spotify)
# Agent可以:
# - 获取YouTube视频字幕
# - 生成内容摘要
# - 保存到Notion数据库
# - 播放背景音乐(Spotify)
通过这一节内容的讲解,希望你能探索更多 MCP 的实现案例,也欢迎投稿至 Helloagents!接下来,让我们学习 A2A 协议。
3. A2A 协议实战
A2A(Agent-to-Agent)是一种支持智能体之间直接通信与协作的协议。
3.1 协议设计动机
MCP 协议解决了智能体与工具的交互,而 A2A 协议则解决智能体之间的协作问题。在一个需要多智能体(如研究员、撰写员、编辑)协作的任务中,它们需要通信、委托任务、协商能力和同步状态。
传统的中央协调器(星型拓扑)方案存在三个主要问题:
单点故障 :协调器失效导致系统整体瘫痪。性能瓶颈 :所有通信都经过中心节点,限制了并发。扩展困难 :增加或修改智能体需要改动中心逻辑。
A2A 协议采用点对点(P2P)架构(网状拓扑),允许智能体直接通信,从根本上解决了上述问题。它的核心是**任务(Task)和 工件(Artifact)**这两个抽象概念,这是它与 MCP 最大的区别,如表 10.7 所示。
表7 A2A 核心概念:
概念
说明
与MCP的区别
示例
Task(任务) 智能体之间委托的单元
比Tool更高层次的抽象
"撰写一篇关于AI的文章"
Artifact(工件) 任务执行产生的结果
比Resource更结构化
文章文本、分析报告
Message(消息) 智能体间的通信载体
包含任务状态信息
"任务已完成50%"
Part(部分) 消息的组成部分
支持多模态内容
文本、图片、文件
Agent Card 智能体描述文档
类似MCP的工具描述
JSON格式的能力声明
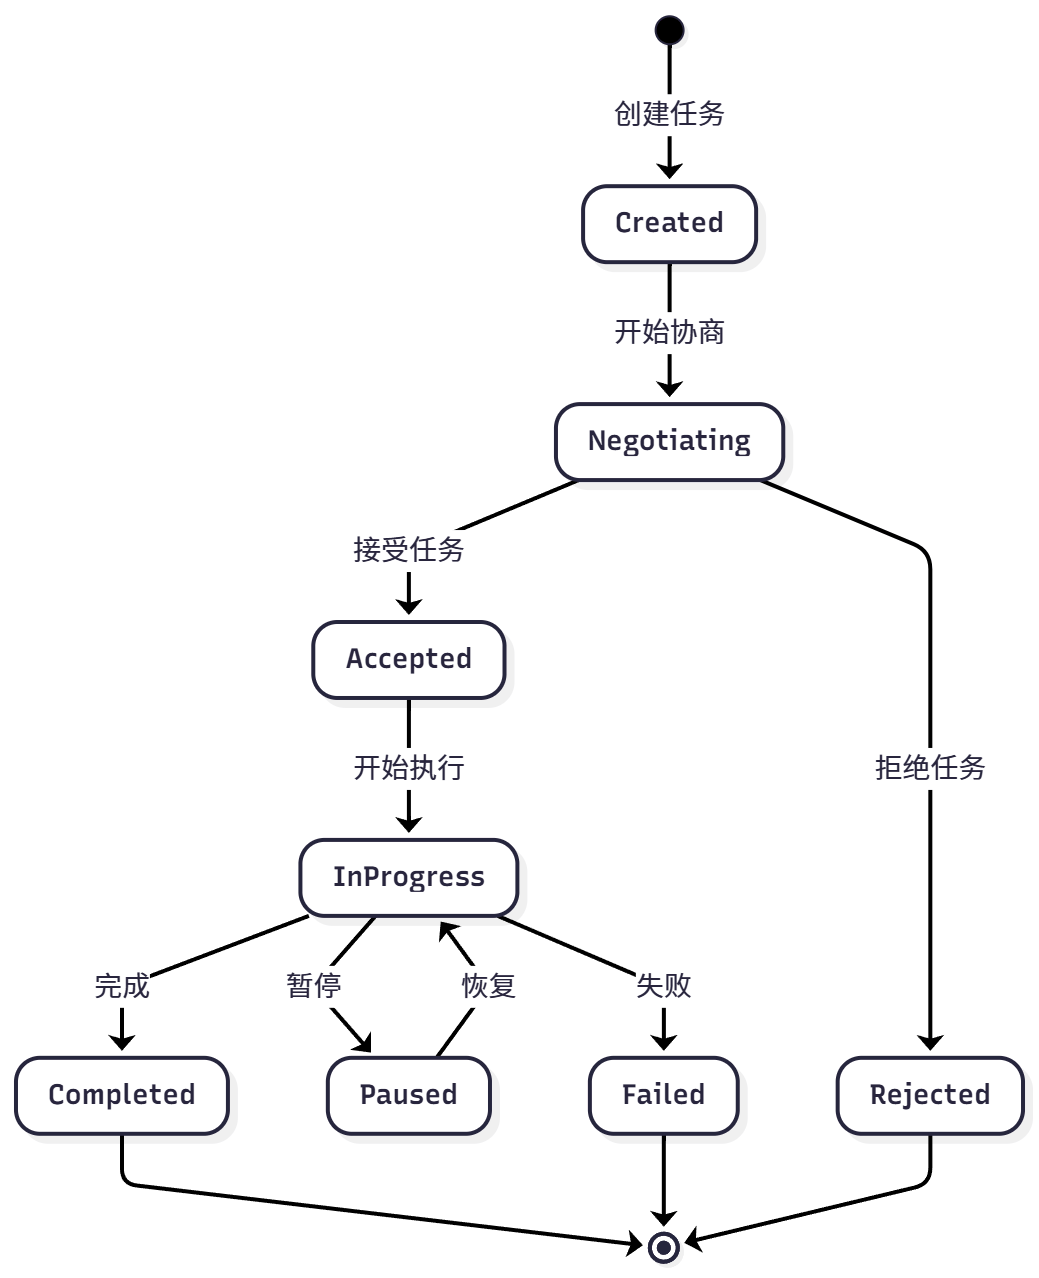
为实现对协作过程的管理,A2A 为任务定义了标准化的生命周期,包括创建、协商、代理、执行中、完成、失败等状态,可见图 10.7。
图7:A2A 任务周期
该机制使智能体可以进行任务协商、进度跟踪和异常处理。
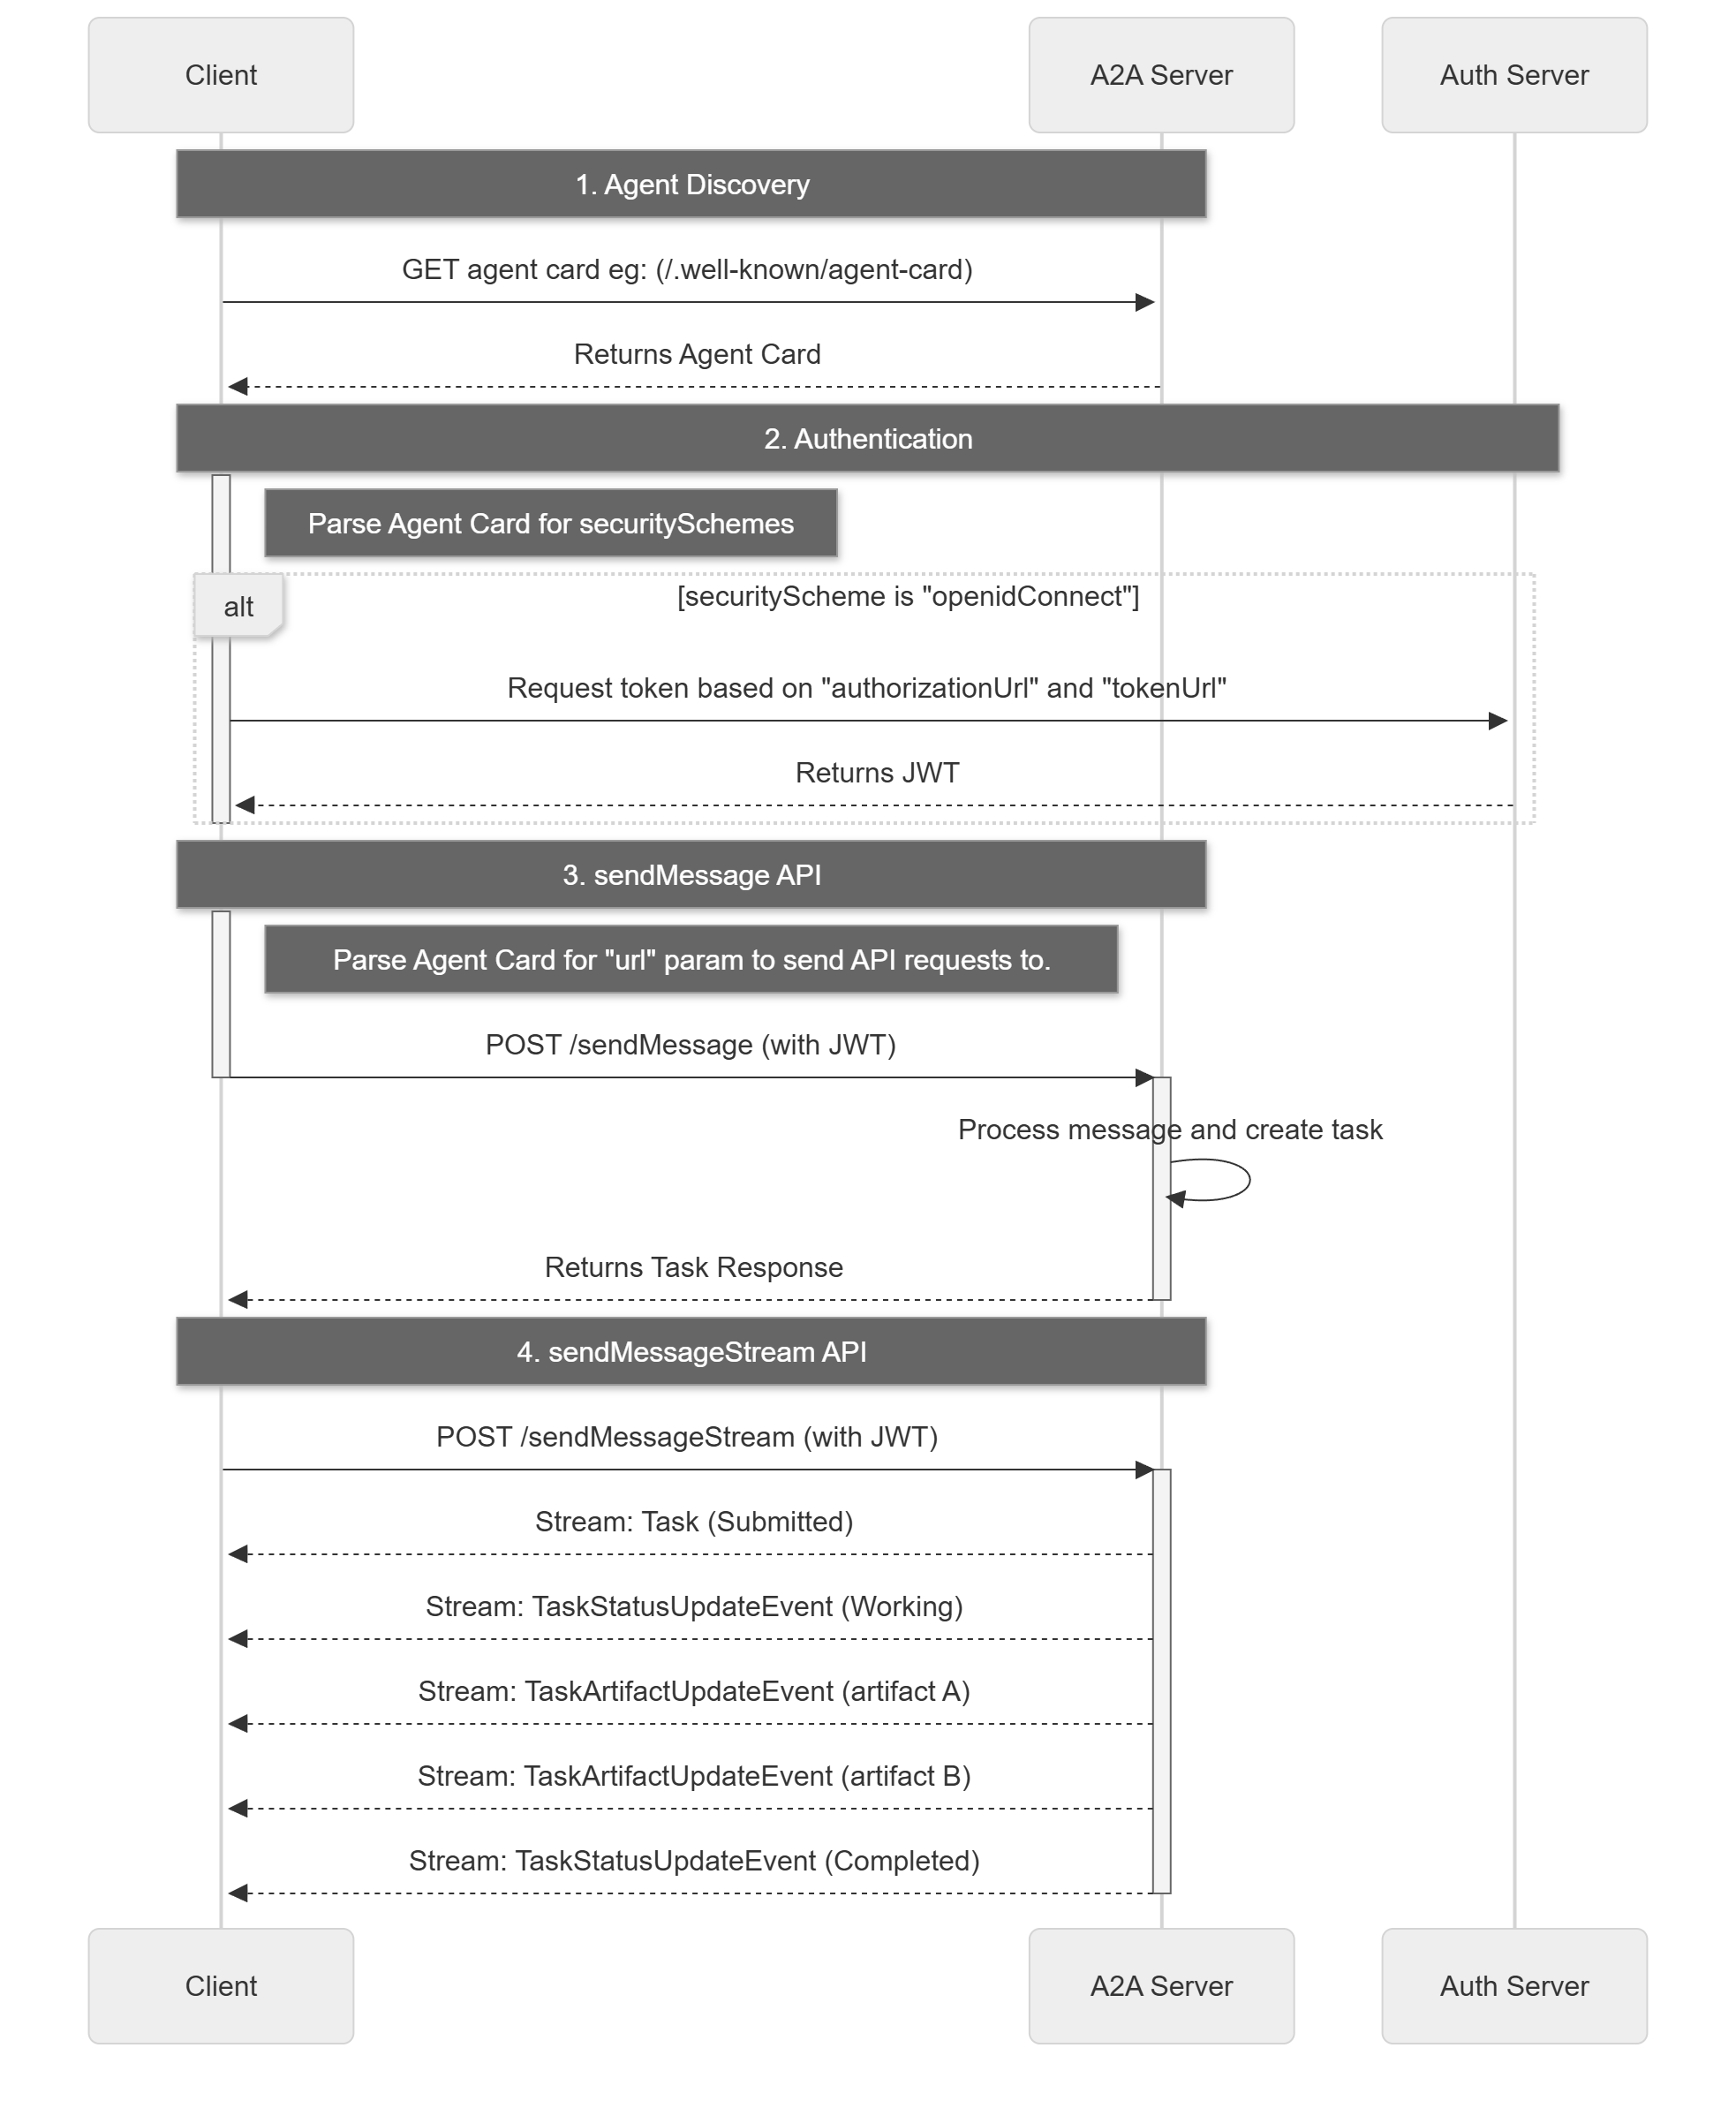
A2A 请求生命周期是一个序列,详细说明了请求遵循的四个主要步骤:代理发现、身份验证、发送消息 API 和发送消息流 API。下图 10.8 借鉴了官网的流程图,用来展示了操作流程,说明了客户端、A2A 服务器和身份验证服务器之间的交互。
图8:A2A 请求生命周期
3.2 使用 A2A 协议实战
A2A 现有实现大部分为 Sample Code,并且即使有 Python 的实现也较为繁琐,因此这里我们只采用模拟协议思想的方式,通过 A2A-SDK 来继承部分功能实现。
1)创建简单的 A2A 智能体
让我们创建一个 A2A 的智能体,同样是计算器案例作为演示:
from hello_agents.protocols.a2a.implementation import A2AServer , A2A_AVAILABLE
def create_calculator_agent ():
"""创建一个计算器智能体"""
if not A2A_AVAILABLE :
print ( "❌ A2A SDK 未安装,请运行: pip install a2a-sdk" )
return None
print ( "🧮 创建计算器智能体" )
# 创建 A2A 服务器
calculator = A2AServer (
name = "calculator-agent" ,
description = "专业的数学计算智能体" ,
version = "1.0.0" ,
capabilities = {
"math" : [ "addition" , "subtraction" , "multiplication" , "division" ],
"advanced" : [ "power" , "sqrt" , "factorial" ]
}
)
# 添加基础计算技能
@calculator . skill ( "add" )
def add_numbers ( query : str ) -> str :
"""加法计算"""
try :
# 简单解析 "计算 5 + 3" 格式
parts = query . replace ( "计算" , "" ) . replace ( "加" , "+" ) . replace ( "加上" , "+" )
if "+" in parts :
numbers = [ float ( x . strip ()) for x in parts . split ( "+" )]
result = sum ( numbers )
return f "计算结果: { ' + ' . join ( map ( str , numbers )) } = { result } "
else :
return "请使用格式: 计算 5 + 3"
except Exception as e :
return f "计算错误: { e } "
@calculator . skill ( "multiply" )
def multiply_numbers ( query : str ) -> str :
"""乘法计算"""
try :
parts = query . replace ( "计算" , "" ) . replace ( "乘以" , "*" ) . replace ( "×" , "*" )
if "*" in parts :
numbers = [ float ( x . strip ()) for x in parts . split ( "*" )]
result = 1
for num in numbers :
result *= num
return f "计算结果: { ' × ' . join ( map ( str , numbers )) } = { result } "
else :
return "请使用格式: 计算 5 * 3"
except Exception as e :
return f "计算错误: { e } "
@calculator . skill ( "info" )
def get_info ( query : str ) -> str :
"""获取智能体信息"""
return f "我是 { calculator . name } ,可以进行基础数学计算。支持的技能: { list ( calculator . skills . keys ()) } "
print ( f "✅ 计算器智能体创建成功,支持技能: { list ( calculator . skills . keys ()) } " )
return calculator
# 创建智能体
calc_agent = create_calculator_agent ()
if calc_agent :
# 测试技能
print ( " \n 🧪 测试智能体技能:" )
test_queries = [
"获取信息" ,
"计算 10 + 5" ,
"计算 6 * 7"
]
for query in test_queries :
if "信息" in query :
result = calc_agent . skills [ "info" ]( query )
elif "+" in query :
result = calc_agent . skills [ "add" ]( query )
elif "*" in query or "×" in query :
result = calc_agent . skills [ "multiply" ]( query )
else :
result = "未知查询类型"
print ( f " 📝 查询: { query } " )
print ( f " 🤖 回复: { result } " )
print ()
2)自定义 A2A 智能体
你也可以创建自己的 A2A 智能体,这里只是进行简单演示:
from hello_agents.protocols.a2a.implementation import A2AServer , A2A_AVAILABLE
def create_custom_agent ():
"""创建自定义智能体"""
if not A2A_AVAILABLE :
print ( "请先安装 A2A SDK: pip install a2a-sdk" )
return None
# 创建智能体
agent = A2AServer (
name = "my-custom-agent" ,
description = "我的自定义智能体" ,
capabilities = { "custom" : [ "skill1" , "skill2" ]}
)
# 添加技能
@agent . skill ( "greet" )
def greet_user ( name : str ) -> str :
"""问候用户"""
return f "你好, { name } !我是自定义智能体。"
@agent . skill ( "calculate" )
def simple_calculate ( expression : str ) -> str :
"""简单计算"""
try :
# 安全的计算(仅支持基本运算)
allowed_chars = set ( '0123456789+-*/(). ' )
if all ( c in allowed_chars for c in expression ):
result = eval ( expression )
return f "计算结果: { expression } = { result } "
else :
return "错误: 只支持基本数学运算"
except Exception as e :
return f "计算错误: { e } "
return agent
# 创建并测试自定义智能体
custom_agent = create_custom_agent ()
if custom_agent :
# 测试技能
print ( "测试问候技能:" )
result1 = custom_agent . skills [ "greet" ]( "张三" )
print ( result1 )
print ( " \n 测试计算技能:" )
result2 = custom_agent . skills [ "calculate" ]( "10 + 5 * 2" )
print ( result2 )
3.3 使用 HelloAgents A2A 工具
HelloAgents 提供了统一的 A2A 工具接口。
1)创建 A2A Agent 服务端
首先,让我们创建一个 Agent 服务端:
from hello_agents.protocols import A2AServer
import threading
import time
# 创建研究员Agent服务
researcher = A2AServer (
name = "researcher" ,
description = "负责搜索和分析资料的Agent" ,
version = "1.0.0"
)
# 定义技能
@researcher . skill ( "research" )
def handle_research ( text : str ) -> str :
"""处理研究请求"""
import re
match = re . search ( r 'research\s+(.+)' , text , re . IGNORECASE )
topic = match . group ( 1 ) . strip () if match else text
# 实际的研究逻辑(这里简化)
result = {
"topic" : topic ,
"findings" : f "关于 { topic } 的研究结果..." ,
"sources" : [ "来源1" , "来源2" , "来源3" ]
}
return str ( result )
# 在后台启动服务
def start_server ():
researcher . run ( host = "localhost" , port = 5000 )
if __name__ == "__main__" :
server_thread = threading . Thread ( target = start_server , daemon = True )
server_thread . start ()
print ( "✅ 研究员Agent服务已启动在 http://localhost:5000" )
# 保持程序运行
try :
while True :
time . sleep ( 1 )
except KeyboardInterrupt :
print ( " \n 服务已停止" )
2)创建 A2A Agent 客户端
现在,让我们创建一个客户端来与服务端通信:
from hello_agents.protocols import A2AClient
# 创建客户端连接到研究员Agent
client = A2AClient ( "http://localhost:5000" )
# 发送研究请求
response = client . execute_skill ( "research" , "research AI在医疗领域的应用" )
print ( f "收到响应: { response . get ( 'result' ) } " )
# 输出:
# 收到响应:{'topic': 'AI在医疗领域的应用', 'findings': '关于AI在医疗领域的应用的研究结果...', 'sources': ['来源1', '来源2', '来源3']}
3)创建 Agent 网络
对于多个 Agent 的协作,我们可以让多个 Agent 相互连接:
from hello_agents.protocols import A2AServer , A2AClient
import threading
import time
# 1. 创建多个Agent服务
researcher = A2AServer (
name = "researcher" ,
description = "研究员"
)
@researcher . skill ( "research" )
def do_research ( text : str ) -> str :
import re
match = re . search ( r 'research\s+(.+)' , text , re . IGNORECASE )
topic = match . group ( 1 ) . strip () if match else text
return str ({ "topic" : topic , "findings" : f " { topic } 的研究结果" })
writer = A2AServer (
name = "writer" ,
description = "撰写员"
)
@writer . skill ( "write" )
def write_article ( text : str ) -> str :
import re
match = re . search ( r 'write\s+(.+)' , text , re . IGNORECASE )
content = match . group ( 1 ) . strip () if match else text
# 尝试解析研究数据
try :
data = eval ( content )
topic = data . get ( "topic" , "未知主题" )
findings = data . get ( "findings" , "无研究结果" )
except :
topic = "未知主题"
findings = content
return f "# { topic } \n\n 基于研究: { findings } \n\n 文章内容..."
editor = A2AServer (
name = "editor" ,
description = "编辑"
)
@editor . skill ( "edit" )
def edit_article ( text : str ) -> str :
import re
match = re . search ( r 'edit\s+(.+)' , text , re . IGNORECASE )
article = match . group ( 1 ) . strip () if match else text
result = {
"article" : article + " \n\n [已编辑优化]" ,
"feedback" : "文章质量良好" ,
"approved" : True
}
return str ( result )
# 2. 启动所有服务
threading . Thread ( target = lambda : researcher . run ( port = 5000 ), daemon = True ) . start ()
threading . Thread ( target = lambda : writer . run ( port = 5001 ), daemon = True ) . start ()
threading . Thread ( target = lambda : editor . run ( port = 5002 ), daemon = True ) . start ()
time . sleep ( 2 ) # 等待服务启动
# 3. 创建客户端连接到各个Agent
researcher_client = A2AClient ( "http://localhost:5000" )
writer_client = A2AClient ( "http://localhost:5001" )
editor_client = A2AClient ( "http://localhost:5002" )
# 4. 协作流程
def create_content ( topic ):
# 步骤1:研究
research = researcher_client . execute_skill ( "research" , f "research { topic } " )
research_data = research . get ( 'result' , '' )
# 步骤2:撰写
article = writer_client . execute_skill ( "write" , f "write { research_data } " )
article_content = article . get ( 'result' , '' )
# 步骤3:编辑
final = editor_client . execute_skill ( "edit" , f "edit { article_content } " )
return final . get ( 'result' , '' )
# 使用
result = create_content ( "AI在医疗领域的应用" )
print ( f " \n 最终结果: \n { result } " )
3.4 在智能体中使用 A2A 工具
现在让我们看看如何将 A2A 集成到 HelloAgents 的智能体中。
from hello_agents import SimpleAgent , HelloAgentsLLM
from hello_agents.tools import A2ATool
from dotenv import load_dotenv
load_dotenv ()
llm = HelloAgentsLLM ()
# 假设已经有一个研究员Agent服务运行在 http://localhost:5000
# 创建协调者Agent
coordinator = SimpleAgent ( name = "协调者" , llm = llm )
# 添加A2A工具,连接到研究员Agent
researcher_tool = A2ATool (
name = "researcher" ,
description = "研究员Agent,可以搜索和分析资料" ,
agent_url = "http://localhost:5000"
)
coordinator . add_tool ( researcher_tool )
# 协调者可以调用研究员Agent
response = coordinator . run ( "请让研究员帮我研究AI在教育领域的应用" )
print ( response )
2)实战案例:智能客服系统
让我们构建一个完整的智能客服系统,包含三个 Agent:
接待员 :分析客户问题类型技术专家 :回答技术问题销售顾问 :回答销售问题
import time
import threading
from dotenv import load_dotenv
from hello_agents import SimpleAgent , HelloAgentsLLM
from hello_agents.tools import A2ATool
from hello_agents.protocols import A2AServer
load_dotenv ()
llm = HelloAgentsLLM ()
# 1. 创建技术专家Agent服务
tech_expert = A2AServer (
name = "tech_expert" ,
description = "技术专家,回答技术问题"
)
@tech_expert . skill ( "answer" )
def answer_tech_question ( text : str ) -> str :
import re
match = re . search ( r 'answer\s+(.+)' , text , re . IGNORECASE )
question = match . group ( 1 ) . strip () if match else text
# 实际应用中,这里会调用LLM或知识库
return f "技术回答:关于' { question } ',我建议您查看我们的技术文档..."
# 2. 创建销售顾问Agent服务
sales_advisor = A2AServer (
name = "sales_advisor" ,
description = "销售顾问,回答销售问题"
)
@sales_advisor . skill ( "answer" )
def answer_sales_question ( text : str ) -> str :
import re
match = re . search ( r 'answer\s+(.+)' , text , re . IGNORECASE )
question = match . group ( 1 ) . strip () if match else text
return f "销售回答:关于' { question } ',我们有特别优惠..."
# 3. 启动服务
threading . Thread ( target = lambda : tech_expert . run ( port = 6000 ), daemon = True ) . start ()
threading . Thread ( target = lambda : sales_advisor . run ( port = 6001 ), daemon = True ) . start ()
time . sleep ( 2 )
# 4. 创建接待员Agent(使用HelloAgents的SimpleAgent)
receptionist = SimpleAgent (
name = "接待员" ,
llm = llm ,
system_prompt = """你是客服接待员,负责:
1. 分析客户问题类型(技术问题 or 销售问题)
2. 将问题转发给相应的专家
3. 整理专家的回答并返回给客户
请保持礼貌和专业。"""
)
# 添加技术专家工具
tech_tool = A2ATool (
agent_url = "http://localhost:6000" ,
name = "tech_expert" ,
description = "技术专家,回答技术相关问题"
)
receptionist . add_tool ( tech_tool )
# 添加销售顾问工具
sales_tool = A2ATool (
agent_url = "http://localhost:6001" ,
name = "sales_advisor" ,
description = "销售顾问,回答价格、购买相关问题"
)
receptionist . add_tool ( sales_tool )
# 5. 处理客户咨询
def handle_customer_query ( query ):
print ( f " \n 客户咨询: { query } " )
print ( "=" * 50 )
response = receptionist . run ( query )
print ( f " \n 客服回复: { response } " )
print ( "=" * 50 )
# 测试不同类型的问题
if __name__ == "__main__" :
handle_customer_query ( "你们的API如何调用?" )
handle_customer_query ( "企业版的价格是多少?" )
handle_customer_query ( "如何集成到我的Python项目中?" )
3)高级用法:Agent 间协商
A2A 协议还支持 Agent 间的协商机制:
from hello_agents.protocols import A2AServer , A2AClient
import threading
import time
# 创建两个需要协商的Agent
agent1 = A2AServer (
name = "agent1" ,
description = "Agent 1"
)
@agent1 . skill ( "propose" )
def handle_proposal ( text : str ) -> str :
"""处理协商提案"""
import re
# 解析提案
match = re . search ( r 'propose\s+(.+)' , text , re . IGNORECASE )
proposal_str = match . group ( 1 ) . strip () if match else text
try :
proposal = eval ( proposal_str )
task = proposal . get ( "task" )
deadline = proposal . get ( "deadline" )
# 评估提案
if deadline >= 7 : # 至少需要7天
result = { "accepted" : True , "message" : "接受提案" }
else :
result = {
"accepted" : False ,
"message" : "时间太紧" ,
"counter_proposal" : { "deadline" : 7 }
}
return str ( result )
except :
return str ({ "accepted" : False , "message" : "无效的提案格式" })
agent2 = A2AServer (
name = "agent2" ,
description = "Agent 2"
)
@agent2 . skill ( "negotiate" )
def negotiate_task ( text : str ) -> str :
"""发起协商"""
import re
# 解析任务和截止日期
match = re . search ( r 'negotiate\s+task:(.+?)\s+deadline:(\d+)' , text , re . IGNORECASE )
if match :
task = match . group ( 1 ) . strip ()
deadline = int ( match . group ( 2 ))
# 向agent1发送提案
proposal = { "task" : task , "deadline" : deadline }
return str ({ "status" : "negotiating" , "proposal" : proposal })
else :
return str ({ "status" : "error" , "message" : "无效的协商请求" })
# 启动服务
threading . Thread ( target = lambda : agent1 . run ( port = 7000 ), daemon = True ) . start ()
threading . Thread ( target = lambda : agent2 . run ( port = 7001 ), daemon = True ) . start ()
4. ANP 协议实战
在 MCP 协议解决了工具调用、A2A 协议解决点对点智能体协作之后,ANP 协议则专注于解决大规模、开放网络环境下的智能体管理问题。
在 10.2 和 10.3 节中,我们学习了 MCP(工具访问)和 A2A(智能体协作)。现在,让我们学习 ANP(Agent Network Protocol)协议,它专注于构建 大规模、开放的智能体网络 。
4.1 协议目标
当一个网络中存在大量功能各异的智能体(例如,自然语言处理、图像识别、数据分析等)时,系统会面临一系列挑战:
服务发现 :当新任务到达时,如何快速找到能够处理该任务的智能体?智能路由 :如果多个智能体都能处理同一任务,如何选择最合适的一个(如根据负载、成本等)并向其分派任务?动态扩展 :如何让新加入网络的智能体被其他成员发现和调用?
ANP 的设计目标就是提供一套标准化的机制,来解决上述的服务发现、路由选择和网络扩展性问题。
为实现其设计目标,ANP 定义了以下几个核心概念,如表 10.8 所示:
表8:ANP 核心概念
概念
说明
示例
ANP Discovery 服务发现中心,用于注册和查询网络中的智能体服务。
一个中央服务器或一个P2P的DHT网络。
Service Info 描述智能体服务的信息,包括其能力、地址和元数据。
{"agent_id": "nlp-agent-01", ...}
ANP Network 对智能体网络的抽象,管理节点间的连接与通信。
整个智能体集群的拓扑视图。
Capability 描述智能体功能的能力标签,用于服务发现时的匹配。
"text_analysis", "image_processing"
Metadata 服务的动态或静态元数据,用于路由决策。
负载情况、服务价格、软件版本等。
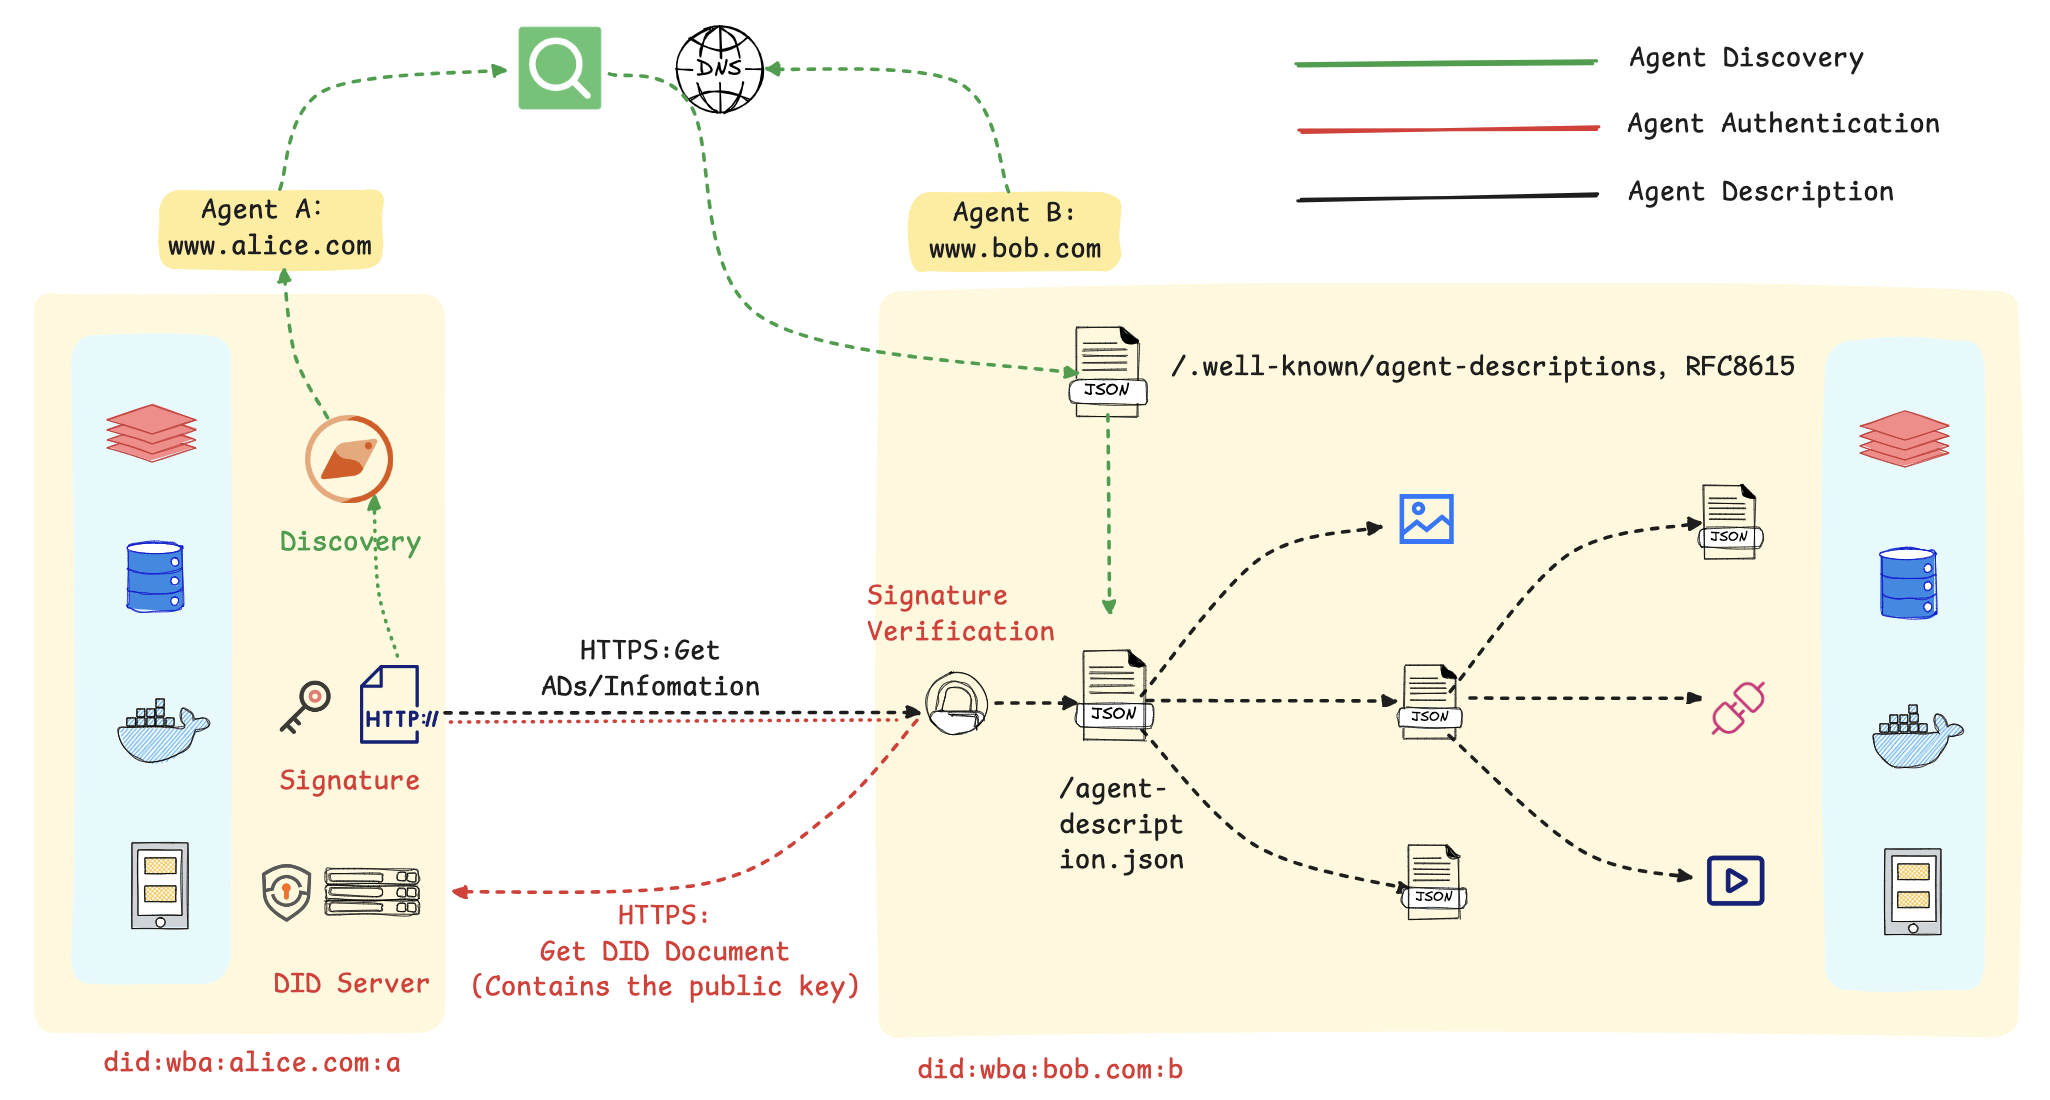
我们同样借用官方的入门指南 来介绍 ANP 的架构设计,如图 10.9 所示。
图9: ANP 整体流程
在这个流程图里,主要包括以下几个步骤:
**服务的发现与匹配:**首先,智能体 A 通过一个公开的发现服务,基于语义或功能描述进行查询,以定位到符合其任务需求的智能体 B。该发现服务通过预先爬取各智能体对外暴露的标准端点(.well-known/agent-descriptions)来建立索引,从而实现服务需求方与提供方的动态匹配。
**基于 DID 的身份验证:**在交互开始时,智能体 A 使用其私钥对包含自身 DID 的请求进行签名。智能体 B 收到后,通过解析该 DID 获取对应的公钥,并以此验证签名的真实性与请求的完整性,从而建立起双方的可信通信。
**标准化的服务执行:**身份验证通过后,智能体 B 响应请求,双方依据预定义的标准接口和数据格式进行数据交换或服务调用(如预订、查询等)。标准化的交互流程是实现跨平台、跨系统互操作性的基础。
总而言之,该机制的核心是利用 DID 构建了一个去中心化的信任根基,并借助标准化的描述协议实现了服务的动态发现。这套方法使得智能体能够在无需中央协调的前提下,安全、高效地在互联网上形成协作网络。
4.2 使用 ANP 服务发现
1)创建服务发现中心
from hello_agents.protocols import ANPDiscovery , register_service
# 创建服务发现中心
discovery = ANPDiscovery ()
# 注册Agent服务
register_service (
discovery = discovery ,
service_id = "nlp_agent_1" ,
service_name = "NLP处理专家A" ,
service_type = "nlp" ,
capabilities = [ "text_analysis" , "sentiment_analysis" , "ner" ],
endpoint = "http://localhost:8001" ,
metadata = { "load" : 0.3 , "price" : 0.01 , "version" : "1.0.0" }
)
register_service (
discovery = discovery ,
service_id = "nlp_agent_2" ,
service_name = "NLP处理专家B" ,
service_type = "nlp" ,
capabilities = [ "text_analysis" , "translation" ],
endpoint = "http://localhost:8002" ,
metadata = { "load" : 0.7 , "price" : 0.02 , "version" : "1.1.0" }
)
print ( "✅ 服务注册完成" )
2)发现服务
from hello_agents.protocols import discover_service
# 按类型查找
nlp_services = discover_service ( discovery , service_type = "nlp" )
print ( f "找到 { len ( nlp_services ) } 个NLP服务" )
# 选择负载最低的服务
best_service = min ( nlp_services , key = lambda s : s . metadata . get ( "load" , 1.0 ))
print ( f "最佳服务: { best_service . service_name } (负载: { best_service . metadata [ 'load' ] } )" )
3)构建 Agent 网络
from hello_agents.protocols import ANPNetwork
# 创建网络
network = ANPNetwork ( network_id = "ai_cluster" )
# 添加节点
for service in discovery . list_all_services ():
network . add_node ( service . service_id , service . endpoint )
# 建立连接(根据能力匹配)
network . connect_nodes ( "nlp_agent_1" , "nlp_agent_2" )
stats = network . get_network_stats ()
print ( f "✅ 网络构建完成,共 { stats [ 'total_nodes' ] } 个节点" )
4.3 实战案例
让我们构建一个完整的分布式任务调度系统:
import random
from dotenv import load_dotenv
from hello_agents.protocols import ANPDiscovery , register_service
from hello_agents import SimpleAgent , HelloAgentsLLM
from hello_agents.tools.builtin import ANPTool
load_dotenv ()
llm = HelloAgentsLLM ()
# 1. 创建服务发现中心
discovery = ANPDiscovery ()
# 2. 注册多个计算节点
for i in range ( 10 ):
register_service (
discovery = discovery ,
service_id = f "compute_node_ { i } " ,
service_name = f "计算节点 { i } " ,
service_type = "compute" ,
capabilities = [ "data_processing" , "ml_training" ],
endpoint = f "http://node { i } :8000" ,
metadata = {
"load" : random . uniform ( 0.1 , 0.9 ),
"cpu_cores" : random . choice ([ 4 , 8 , 16 ]),
"memory_gb" : random . choice ([ 16 , 32 , 64 ]),
"gpu" : random . choice ([ True , False ])
}
)
print ( f "✅ 注册了 { len ( discovery . list_all_services ()) } 个计算节点" )
# 3. 创建任务调度Agent
scheduler = SimpleAgent (
name = "任务调度器" ,
llm = llm ,
system_prompt = """你是一个智能任务调度器,负责:
1. 分析任务需求
2. 选择最合适的计算节点
3. 分配任务
选择节点时考虑:负载、CPU核心数、内存、GPU等因素。"""
)
# 添加ANP工具
anp_tool = ANPTool (
name = "service_discovery" ,
description = "服务发现工具,可以查找和选择计算节点" ,
discovery = discovery
)
scheduler . add_tool ( anp_tool )
# 4. 智能任务分配
def assign_task ( task_description ):
print ( f " \n 任务: { task_description } " )
print ( "=" * 50 )
# 让Agent智能选择节点
response = scheduler . run ( f """
请为以下任务选择最合适的计算节点:
{ task_description }
要求:
1. 列出所有可用节点
2. 分析每个节点的特点
3. 选择最合适的节点
4. 说明选择理由
""" )
print ( response )
print ( "=" * 50 )
# 测试不同类型的任务
assign_task ( "训练一个大型深度学习模型,需要GPU支持" )
assign_task ( "处理大量文本数据,需要高内存" )
assign_task ( "运行轻量级数据分析任务" )
这是一个负载均衡示例
import random
from hello_agents.protocols import ANPDiscovery , register_service
# 创建服务发现中心
discovery = ANPDiscovery ()
# 注册多个相同类型的服务
for i in range ( 5 ):
register_service (
discovery = discovery ,
service_id = f "api_server_ { i } " ,
service_name = f "API服务器 { i } " ,
service_type = "api" ,
capabilities = [ "rest_api" ],
endpoint = f "http://api { i } :8000" ,
metadata = { "load" : random . uniform ( 0.1 , 0.9 )}
)
# 负载均衡函数
def get_best_server ():
"""选择负载最低的服务器"""
servers = discovery . discover_services ( service_type = "api" )
if not servers :
return None
best = min ( servers , key = lambda s : s . metadata . get ( "load" , 1.0 ))
return best
# 模拟请求分配
for i in range ( 10 ):
server = get_best_server ()
print ( f "请求 { i + 1 } -> { server . service_name } (负载: { server . metadata [ 'load' ] : .2f } )" )
# 更新负载(模拟)
server . metadata [ "load" ] += 0.1
5. 构建自定义 MCP 服务器
在前面的章节中,我们学习了如何使用现有的 MCP 服务。并且也了解到了不同协议的特点。现在,让我们学习如何构建自己的 MCP 服务器。
5.1 创建你的第一个 MCP 服务器
1)为什么要构建自定义 MCP 服务器?
虽然可以直接使用公开的 MCP 服务,但在许多实际应用场景中,需要构建自定义的 MCP 服务器以满足特定需求。
主要动机包括以下几点:
封装业务逻辑 :将企业内部特有的业务流程或复杂操作封装为标准化的 MCP 工具,供智能体统一调用。访问私有数据 :创建一个安全可控的接口或代理,用于访问内部数据库、API 或其他无法对公网暴露的私有数据源。性能专项优化 :针对高频调用或对响应延迟有严苛要求的应用场景,进行深度优化。功能定制扩展 :实现标准 MCP 服务未提供的特定功能,例如集成专有算法模型或连接特定的硬件设备。
2)教学案例:天气查询 MCP 服务器
让我们从一个简单的天气查询服务器开始,逐步学习 MCP 服务器开发:
"""天气查询 MCP 服务器"""
import json
import requests
import os
from datetime import datetime
from typing import Dict , Any
from hello_agents.protocols import MCPServer
# 创建 MCP 服务器
weather_server = MCPServer ( name = "weather-server" , description = "真实天气查询服务" )
CITY_MAP = {
"北京" : "Beijing" , "上海" : "Shanghai" , "广州" : "Guangzhou" ,
"深圳" : "Shenzhen" , "杭州" : "Hangzhou" , "成都" : "Chengdu" ,
"重庆" : "Chongqing" , "武汉" : "Wuhan" , "西安" : "Xi'an" ,
"南京" : "Nanjing" , "天津" : "Tianjin" , "苏州" : "Suzhou"
}
def get_weather_data ( city : str ) -> Dict [ str , Any ]:
"""从 wttr.in 获取天气数据"""
city_en = CITY_MAP . get ( city , city )
url = f "https://wttr.in/ { city_en } ?format=j1"
response = requests . get ( url , timeout = 10 )
response . raise_for_status ()
data = response . json ()
current = data [ "current_condition" ][ 0 ]
return {
"city" : city ,
"temperature" : float ( current [ "temp_C" ]),
"feels_like" : float ( current [ "FeelsLikeC" ]),
"humidity" : int ( current [ "humidity" ]),
"condition" : current [ "weatherDesc" ][ 0 ][ "value" ],
"wind_speed" : round ( float ( current [ "windspeedKmph" ]) / 3.6 , 1 ),
"visibility" : float ( current [ "visibility" ]),
"timestamp" : datetime . now () . strftime ( "%Y-%m- %d %H:%M:%S" )
}
# 定义工具函数
def get_weather ( city : str ) -> str :
"""获取指定城市的当前天气"""
try :
weather_data = get_weather_data ( city )
return json . dumps ( weather_data , ensure_ascii = False , indent = 2 )
except Exception as e :
return json . dumps ({ "error" : str ( e ), "city" : city }, ensure_ascii = False )
def list_supported_cities () -> str :
"""列出所有支持的中文城市"""
result = { "cities" : list ( CITY_MAP . keys ()), "count" : len ( CITY_MAP )}
return json . dumps ( result , ensure_ascii = False , indent = 2 )
def get_server_info () -> str :
"""获取服务器信息"""
info = {
"name" : "Weather MCP Server" ,
"version" : "1.0.0" ,
"tools" : [ "get_weather" , "list_supported_cities" , "get_server_info" ]
}
return json . dumps ( info , ensure_ascii = False , indent = 2 )
# 注册工具到服务器
weather_server . add_tool ( get_weather )
weather_server . add_tool ( list_supported_cities )
weather_server . add_tool ( get_server_info )
if __name__ == "__main__" :
weather_server . run ()
3)测试自定义 MCP 服务器
然后创建测试脚本:
"""测试天气查询 MCP 服务器"""
import asyncio
import json
import sys
import os
sys . path . insert ( 0 , os . path . join ( os . path . dirname ( __file__ ), '..' , 'HelloAgents' ))
from hello_agents.protocols.mcp.client import MCPClient
async def test_weather_server ():
server_script = os . path . join ( os . path . dirname ( __file__ ), "14_weather_mcp_server.py" )
client = MCPClient ([ "python" , server_script ])
try :
async with client :
# 测试1: 获取服务器信息
info = json . loads ( await client . call_tool ( "get_server_info" , {}))
print ( f "服务器: { info [ 'name' ] } v { info [ 'version' ] } " )
# 测试2: 列出支持的城市
cities = json . loads ( await client . call_tool ( "list_supported_cities" , {}))
print ( f "支持城市: { cities [ 'count' ] } 个" )
# 测试3: 查询北京天气
weather = json . loads ( await client . call_tool ( "get_weather" , { "city" : "北京" }))
if "error" not in weather :
print ( f " \n 北京天气: { weather [ 'temperature' ] } °C, { weather [ 'condition' ] } " )
# 测试4: 查询深圳天气
weather = json . loads ( await client . call_tool ( "get_weather" , { "city" : "深圳" }))
if "error" not in weather :
print ( f "深圳天气: { weather [ 'temperature' ] } °C, { weather [ 'condition' ] } " )
print ( " \n ✅ 所有测试完成!" )
except Exception as e :
print ( f "❌ 测试失败: { e } " )
if __name__ == "__main__" :
asyncio . run ( test_weather_server ())
4)在 Agent 中使用自定义 MCP 服务器
"""在 Agent 中使用天气 MCP 服务器"""
import os
from dotenv import load_dotenv
from hello_agents import SimpleAgent , HelloAgentsLLM
from hello_agents.tools import MCPTool
load_dotenv ()
def create_weather_assistant ():
"""创建天气助手"""
llm = HelloAgentsLLM ()
assistant = SimpleAgent (
name = "天气助手" ,
llm = llm ,
system_prompt = """你是天气助手,可以查询城市天气。
使用 mcp_get_weather 工具查询天气,支持中文城市名。
"""
)
# 添加天气 MCP 工具
server_script = os . path . join ( os . path . dirname ( __file__ ), "14_weather_mcp_server.py" )
weather_tool = MCPTool ( server_command = [ "python" , server_script ])
# 显式展开并注册 MCP 子工具
expanded_tools = weather_tool . get_expanded_tools ()
if not expanded_tools :
raise RuntimeError ( "未发现天气 MCP 子工具,请检查服务脚本、依赖和启动日志。" )
for expanded_tool in expanded_tools :
assistant . add_tool ( expanded_tool )
return assistant
def demo ():
"""演示"""
assistant = create_weather_assistant ()
print ( " \n 查询北京天气:" )
response = assistant . run ( "北京今天天气怎么样?" )
print ( f "回答: { response } \n " )
def interactive ():
"""交互模式"""
assistant = create_weather_assistant ()
while True :
user_input = input ( " \n 你: " ) . strip ()
if user_input . lower () in [ 'quit' , 'exit' ]:
break
response = assistant . run ( user_input )
print ( f "助手: { response } " )
if __name__ == "__main__" :
import sys
if len ( sys . argv ) > 1 and sys . argv [ 1 ] == "demo" :
demo ()
else :
interactive ()
终端输出 连接到 MCP 服务器...
连接成功!
连接已断开
工具 'mcp_get_weather' 已注册。
工具 'mcp_list_supported_cities' 已注册。
工具 'mcp_get_server_info' 已注册。
我想查询北京的天气
连接到 MCP 服务器...
连接成功!
连接已断开
当前北京的天气情况如下:
温度:10.0°C
体感温度:9.0°C
湿度:94%
天气状况:小雨
风速:1.7米/秒
能见度:10.0公里
时间戳:2025年10月9日 13 :46:40
5.2 上传 MCP 服务器
我们创建了一个真实的天气查询 MCP 服务器。现在,让我们将它发布到 Smithery 平台,让全世界的开发者都能使用我们的服务。
(1)什么是 Smithery?
Smithery 是 MCP 服务器的官方发布平台,类似于 Python 的 PyPI 或 Node.js 的 npm。通过 Smithery,用户可以:
🔍 发现和搜索 MCP 服务器
📦 一键安装 MCP 服务器
📊 查看服务器的使用统计和评价
🔄 自动获取服务器更新
(2)准备发布
首先,我们需要将项目整理成标准的发布格式,这个文件夹已经在code目录下整理好,可供大家参考:
需要注意的是,smithery.yaml 是 Smithery 平台的配置文件:
smithery.yaml name : weather-mcp-server
displayName : Weather MCP Server
description : Real-time weather query MCP server based on HelloAgents framework
version : 1.0.0
author : HelloAgents Team
homepage : https://github.com/yourusername/weather-mcp-server
license : MIT
categories :
- weather
- data
tags :
- weather
- real-time
- helloagents
- wttr
runtime : container
build :
dockerfile : Dockerfile
dockerBuildPath : .
startCommand :
type : http
tools :
- name : get_weather
description : Get current weather for a city
- name : list_supported_cities
description : List all supported cities
- name : get_server_info
description : Get server information
配置说明:
name: 服务器的唯一标识符(小写,用连字符分隔)displayName: 显示名称description: 简短描述version: 版本号(遵循语义化版本)runtime: 运行时环境(python/node)entrypoint: 入口文件tools: 工具列表
pyproject.toml 是 Python 项目的标准配置文件,Smithery 要求必须包含此文件,因为后续会打包成一个 server:
pyproject.toml [build-system]
requires = [ "setuptools>=61.0" , "wheel" ]
build-backend = "setuptools.build_meta"
[project]
name = "weather-mcp-server"
version = "1.0.0"
description = "Real-time weather query MCP server based on HelloAgents framework"
readme = "README.md"
license = { text = "MIT" }
authors = [
{ name = "HelloAgents Team" , email = "xxx" }
]
requires-python = ">=3.10"
dependencies = [
"hello-agents>=0.2.1" ,
"requests>=2.31.0" ,
]
[project.urls]
Homepage = "https://github.com/yourusername/weather-mcp-server"
Repository = "https://github.com/yourusername/weather-mcp-server"
"Bug Tracker" = "https://github.com/yourusername/weather-mcp-server/issues"
[tool.setuptools]
py-modules = [ "server" ]
配置说明:
[build-system]: 指定构建工具(setuptools)[project]: 项目元数据
name: 项目名称version: 版本号(遵循语义化版本)dependencies: 项目依赖列表requires-python: Python 版本要求
[project.urls]: 项目相关链接[tool.setuptools]: setuptools 配置
虽然 Smithery 会自动生成 Dockerfile,但提供自定义 Dockerfile 可以确保部署成功:
# Multi-stage build for weather-mcp-server
FROM python:3.12-slim-bookworm as base
# Set working directory
WORKDIR /app
# Install system dependencies
RUN apt-get update && apt-get install -y \
--no-install-recommends \
&& rm -rf /var/lib/apt/lists/*
# Copy project files
COPY pyproject.toml requirements.txt ./
COPY server.py ./
# Install Python dependencies
RUN pip install --no-cache-dir --upgrade pip && \
pip install --no-cache-dir -r requirements.txt
# Set environment variables
ENV PYTHONUNBUFFERED = 1
ENV PORT = 8081
# Expose port (Smithery uses 8081)
EXPOSE 8081
# Health check
HEALTHCHECK --interval= 30s --timeout= 3s --start-period= 5s --retries= 3 \
CMD python -c "import sys; sys.exit(0)"
# Run the MCP server
CMD [ "python" , "server.py" ]
Dockerfile 配置说明:
基础镜像 : python:3.12-slim-bookworm - 轻量级 Python 镜像工作目录 : /app - 应用程序根目录端口 : 8081 - Smithery 平台标准端口启动命令 : python server.py - 运行 MCP 服务器
在这里,我们需要 Forkhello-agents仓库,得到code中的源码,并使用自己的 github 创建一个名为weather-mcp-server的仓库,将yourusername改为自己 github 的 Username。
(3)提交到 Smithery
打开浏览器,访问 https://smithery.ai/ 。使用 GitHub 账号登录 Smithery。点击页面上的 "Publish Server" 按钮,输入你的 GitHub 仓库 URL:https://github.com/yourusername/weather-mcp-server,即可等待发布。
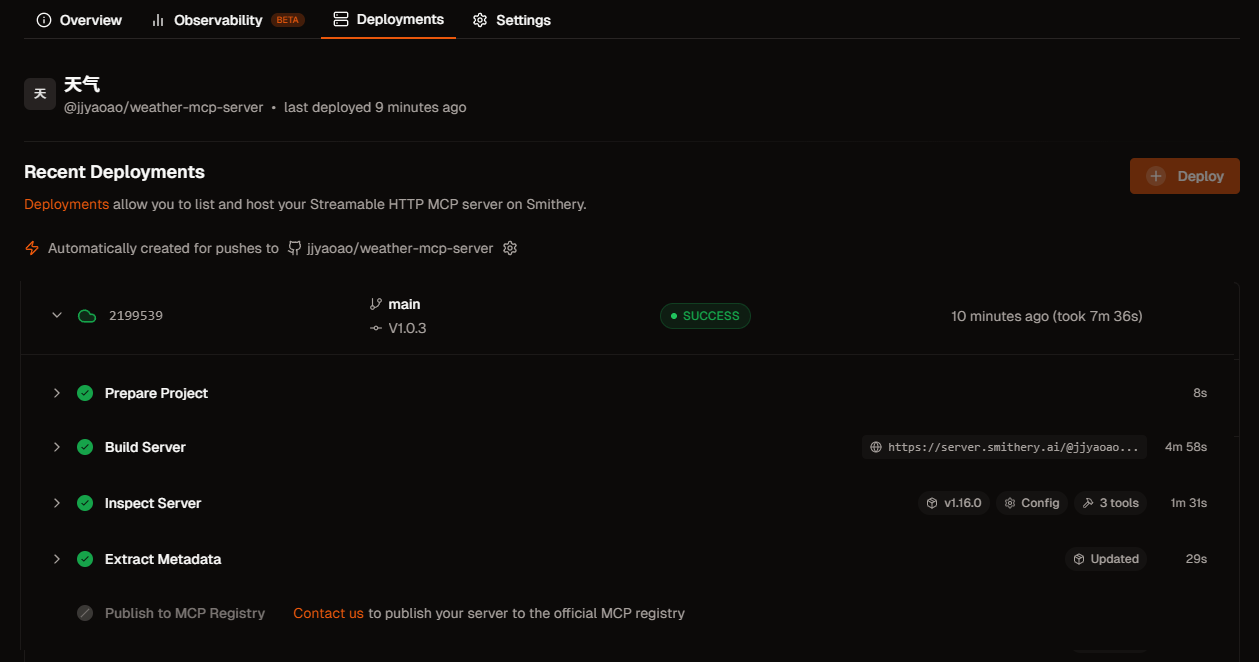
一旦发布完成,可以看到类似这样的页面,如图10 所示:
图10:Smithery 发布成功页面
一旦服务器发布成功,用户可以通过以下方式使用:
方式 1:通过 Smithery CLI
# 安装 Smithery CLI
install -g @smithery/cli
# 安装你的服务器
install weather-mcp-server
方式 2:在 Claude Desktop 中配置
{
"mcpServers" : {
"weather" : {
"command" : "smithery" ,
"args" : [ "run" , "weather-mcp-server" ]
}
}
}
方式 3:在 HelloAgents 中使用
from hello_agents import SimpleAgent , HelloAgentsLLM
from hello_agents.tools.builtin.protocol_tools import MCPTool
agent = SimpleAgent ( name = "天气助手" , llm = HelloAgentsLLM ())
# 使用 Smithery 安装的服务器
weather_tool = MCPTool (
server_command = [ "smithery" , "run" , "weather-mcp-server" ]
)
agent . add_tool ( weather_tool )
response = agent . run ( "北京今天天气怎么样?" )
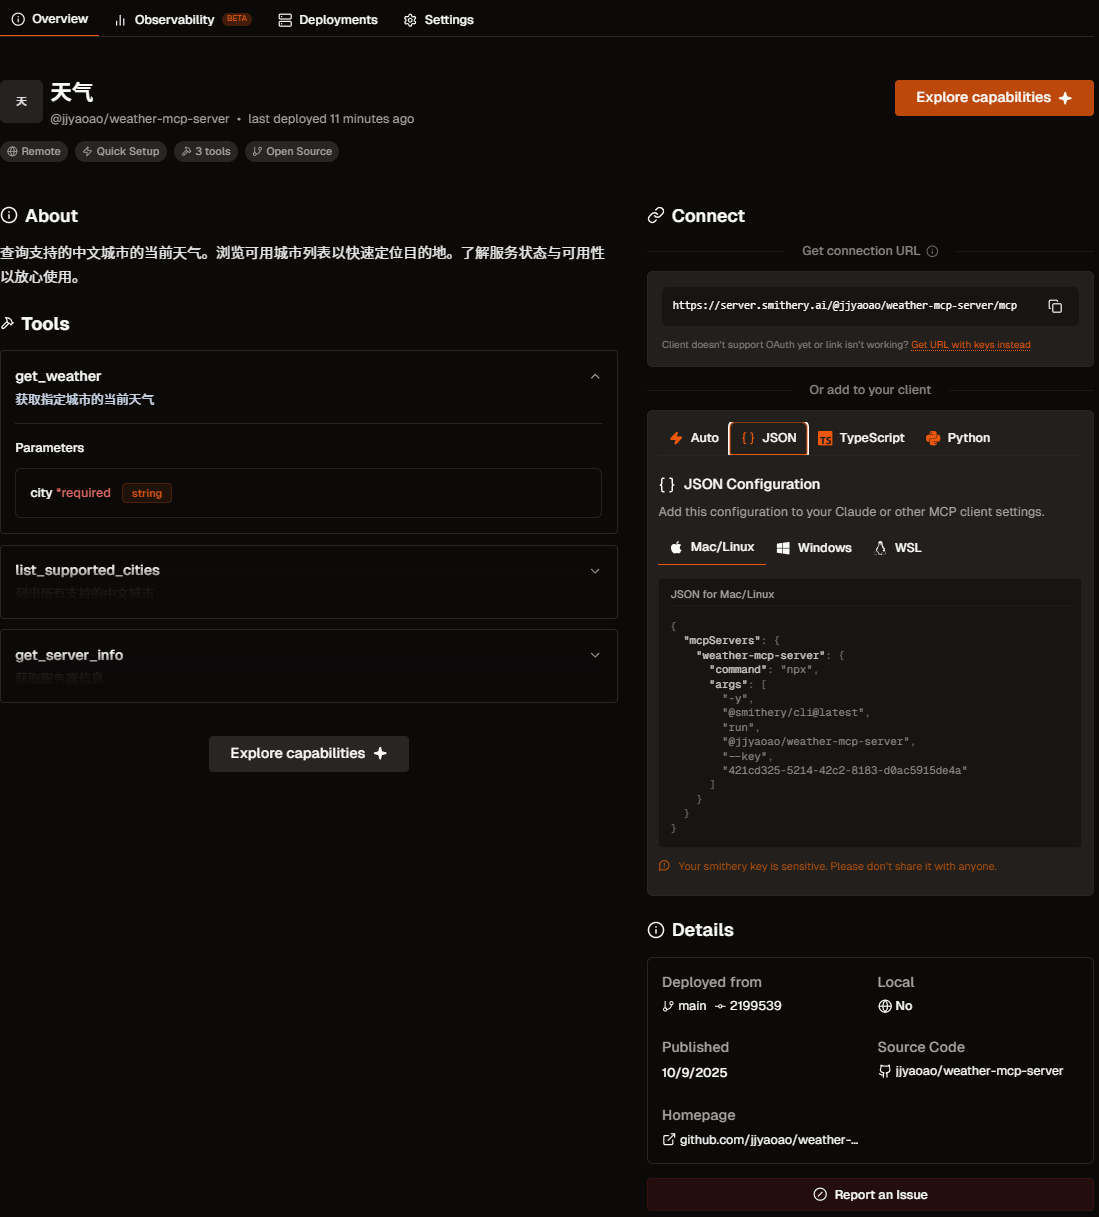
当然,这里只是举例,还有更多的用法可以自行探索,下图11 展示了当 MCP 工具发布成功会包含的信息,显示服务的名称“天气”,其唯一标识符 @jjyaoao/weather-mcp-server 以及状态信息。Tools 区域就是我们刚刚实现的方法,Connect 区则提供了连接和使用此服务所需的技术信息,包括服务的接入 URL 地址 和多种语言/环境下的配置代码片段 。如果想要更加深入了解可以点击这个链接 。
图11:Smithery 发布成功的 MCP 工具
现在是时候去创造你的 MCP 服务器了!
6. 本章总结
本章系统性地介绍了智能体通信的三种核心协议:MCP、A2A 与 ANP,并探讨了它们的设计理念、应用场景与实践方法。
协议定位:
MCP (Model Context Protocol) : 作为智能体与工具之间的桥梁,提供统一的工具访问接口,适用于增强单个智能体的能力。A2A (Agent-to-Agent Protocol) : 作为智能体之间的对话系统,支持直接通信与任务协商,适用于小规模团队的紧密协作。ANP (Agent Network Protocol) : 作为智能体的“互联网”,提供服务发现、路由与负载均衡机制,适用于构建大规模、开放的智能体网络。
HelloAgents 的集成方案
在HelloAgents框架中,这三种协议被统一抽象为工具(Tool),实现了无缝集成,允许开发者灵活地为智能体添加不同层级的通信能力:
# 统一的Tool接口
from hello_agents.tools import MCPTool , A2ATool , ANPTool
# 所有协议都可以作为Tool添加到Agent
agent . add_tool ( MCPTool ( ... ))
agent . add_tool ( A2ATool ( ... ))
agent . add_tool ( ANPTool ( ... ))
实战经验总结
优先利用成熟的社区 MCP 服务,以减少不必要的重复开发。
根据系统规模选择合适的协议:小规模协作场景推荐使用 A2A,大规模网络场景则应采用 ANP。
完成本章后,建议你:
动手实践 :
构建自己的 MCP 服务器
利用协议创建多 Agent 协作系统
MCP、A2A 与 ANP 的组合应用策略
深入学习 :
参与社区 :
向社区贡献新的 MCP 服务
分享个人开发的智能体实现案例
参与相关协议的技术标准讨论,也可以在 Issue 提问或是直接帮助 Helloagents 支持新的 example 案例
恭喜你完成第十章的学习!
你现在已经掌握了智能体通信协议的核心知识。继续加油!🚀
7. 习题
提示 :部分习题没有标准答案,重点在于培养学习者对智能体通信协议的综合理解和实践能力。
本章介绍了三种智能体通信协议:MCP、A2A 和 ANP。请分析:
在 10.1.2 节中对比了三种协议的设计理念。请深入分析:为什么 MCP 强调"上下文共享",A2A 强调"对话式协作",而 ANP 强调"网络拓扑"?这些设计理念分别解决了什么核心问题?
假设你要构建一个"智能客服系统",需要以下功能:(1)访问客户数据库和订单系统;(2)多个专业客服智能体协作处理复杂问题;(3)支持大规模并发用户请求。请为每个功能选择最合适的协议,并说明理由。
三种协议是否可以组合使用?请设计一个实际应用场景,展示如何同时使用 MCP、A2A 和 ANP 来构建一个完整的智能体系统。画出系统架构图并说明各协议的职责。
MCP(Model Context Protocol)是智能体与工具通信的标准协议。基于 10.2 节的内容,请深入思考:
提示 :这是一道动手实践题,建议实际操作
在 10.2.3 节的 MCP 服务器实现中,我们定义了list_tools、call_tool等核心方法。请扩展这个实现,添加一个新的 MCP 服务器,提供以下工具:(1)数据库查询工具;(2)数据可视化工具;(3)报表生成工具。要求工具之间能够协作完成复杂的数据分析任务。
MCP 协议支持"资源"(Resources)和"提示"(Prompts)两个重要概念,但本章主要聚焦于"工具"(Tools)。请查阅 MCP 官方文档,了解 Resources 和 Prompts 的设计目的,并设计一个应用场景,展示如何利用这三个核心概念构建更强大的智能体系统。
MCP 使用 JSON-RPC 2.0 作为底层通信协议,通过 stdio 进行进程间通信。请分析:这种设计有什么优势和局限性?如果需要支持远程 MCP 服务器(通过 HTTP/WebSocket 访问),应该如何扩展当前的实现?
A2A(Agent-to-Agent Protocol)支持智能体间的对话式协作。基于 10.3 节的内容,请完成以下扩展实践:
提示 :这是一道动手实践题,建议实际操作
在 10.3.4 节的"研究团队"案例中,研究员和撰写员通过 A2A 协议协作完成论文写作。请扩展这个案例,添加第三个智能体"审稿人"(Reviewer),它能够评审论文质量并提出修改建议。设计三个智能体之间的协作流程,并实现完整的代码。
A2A 协议定义了task、task_result等消息类型。请分析:如果协作过程中出现冲突(如两个智能体对同一问题有不同意见),应该如何设计冲突解决机制?请扩展 A2A 协议,添加"协商"(negotiation)和"投票"(voting)等消息类型。
对比 A2A 协议与第六章介绍的 AutoGen、CAMEL 等多智能体框架:A2A 作为标准协议,与这些框架的关系是什么?它们能否互相替代?请设计一个方案,让基于 A2A 协议的智能体能够与 AutoGen 框架中的智能体进行通信。
ANP(Agent Network Protocol)支持大规模智能体网络。基于 10.4 节的内容,请深入分析:
在 10.4.2 节中介绍了 ANP 的网络拓扑设计,包括星型、网状、分层等结构。请分析:在什么场景下应该选择哪种拓扑结构?如果网络规模从 10 个智能体扩展到 1000 个智能体,拓扑结构应该如何演进?
ANP 协议支持"路由"(routing)和"发现"(discovery)机制,让智能体能够动态找到合适的协作伙伴。请设计一个"智能路由算法":根据任务类型、智能体能力、网络负载等因素,自动选择最优的消息路由路径。
在 10.4.4 节的"智能城市"案例中,多个智能体协作管理城市系统。请思考:如果某个关键智能体(如交通管理智能体)出现故障,整个系统应该如何应对?请设计一个"容错机制",包括故障检测、备份切换、状态恢复等功能。
智能体通信协议的安全性和隐私保护是实际应用中的关键问题。请思考:
在 10.2.4 节的 MCP 客户端实现中,智能体可以调用 MCP 服务器提供的任何工具。请分析:这种设计存在什么安全风险?如果 MCP 服务器提供了危险操作(如删除文件、执行系统命令),应该如何设计权限控制机制?
A2A 和 ANP 协议涉及多个智能体之间的通信,可能包含敏感信息(如用户隐私数据、商业机密)。请设计一个"端到端加密"方案:确保消息在传输过程中不被窃听或篡改,同时支持智能体身份认证和访问控制。
在大规模智能体网络中,恶意智能体可能会发送虚假信息、发起拒绝服务攻击或窃取其他智能体的数据。请设计一个"信任评估系统":根据智能体的历史行为、协作质量、社区评价等因素,动态评估每个智能体的可信度,并据此调整通信策略。